
What You'll Build
This guide walks you through sending transactional emails with the Kibamail API. By the end, you'll know how to:
- Create an API key with the right permissions
- Install and configure the Node.js SDK
- Send emails with HTML content
- Use templates with variable substitution
- Add attachments and custom metadata
- Handle errors and track delivery
- Inspect sent emails and view event timelines in the dashboard
Transactional vs Broadcast Emails
Transactional emails are one-off messages triggered by user actions:
- Password reset links
- Order confirmations
- Account verification
- Shipping notifications
- Payment receipts
They differ from broadcasts, which send the same message to many recipients at once. Transactional emails are immediate and personalized to a specific user action.
Prerequisites
Before starting, make sure you have:
- A Kibamail account with a workspace
- A verified sending domain in your workspace
- Node.js 18 or higher installed
- Basic familiarity with TypeScript/JavaScript
Step 1: Create an API Key
API keys authenticate your application with Kibamail. For transactional emails, you need the smtp:send scope.
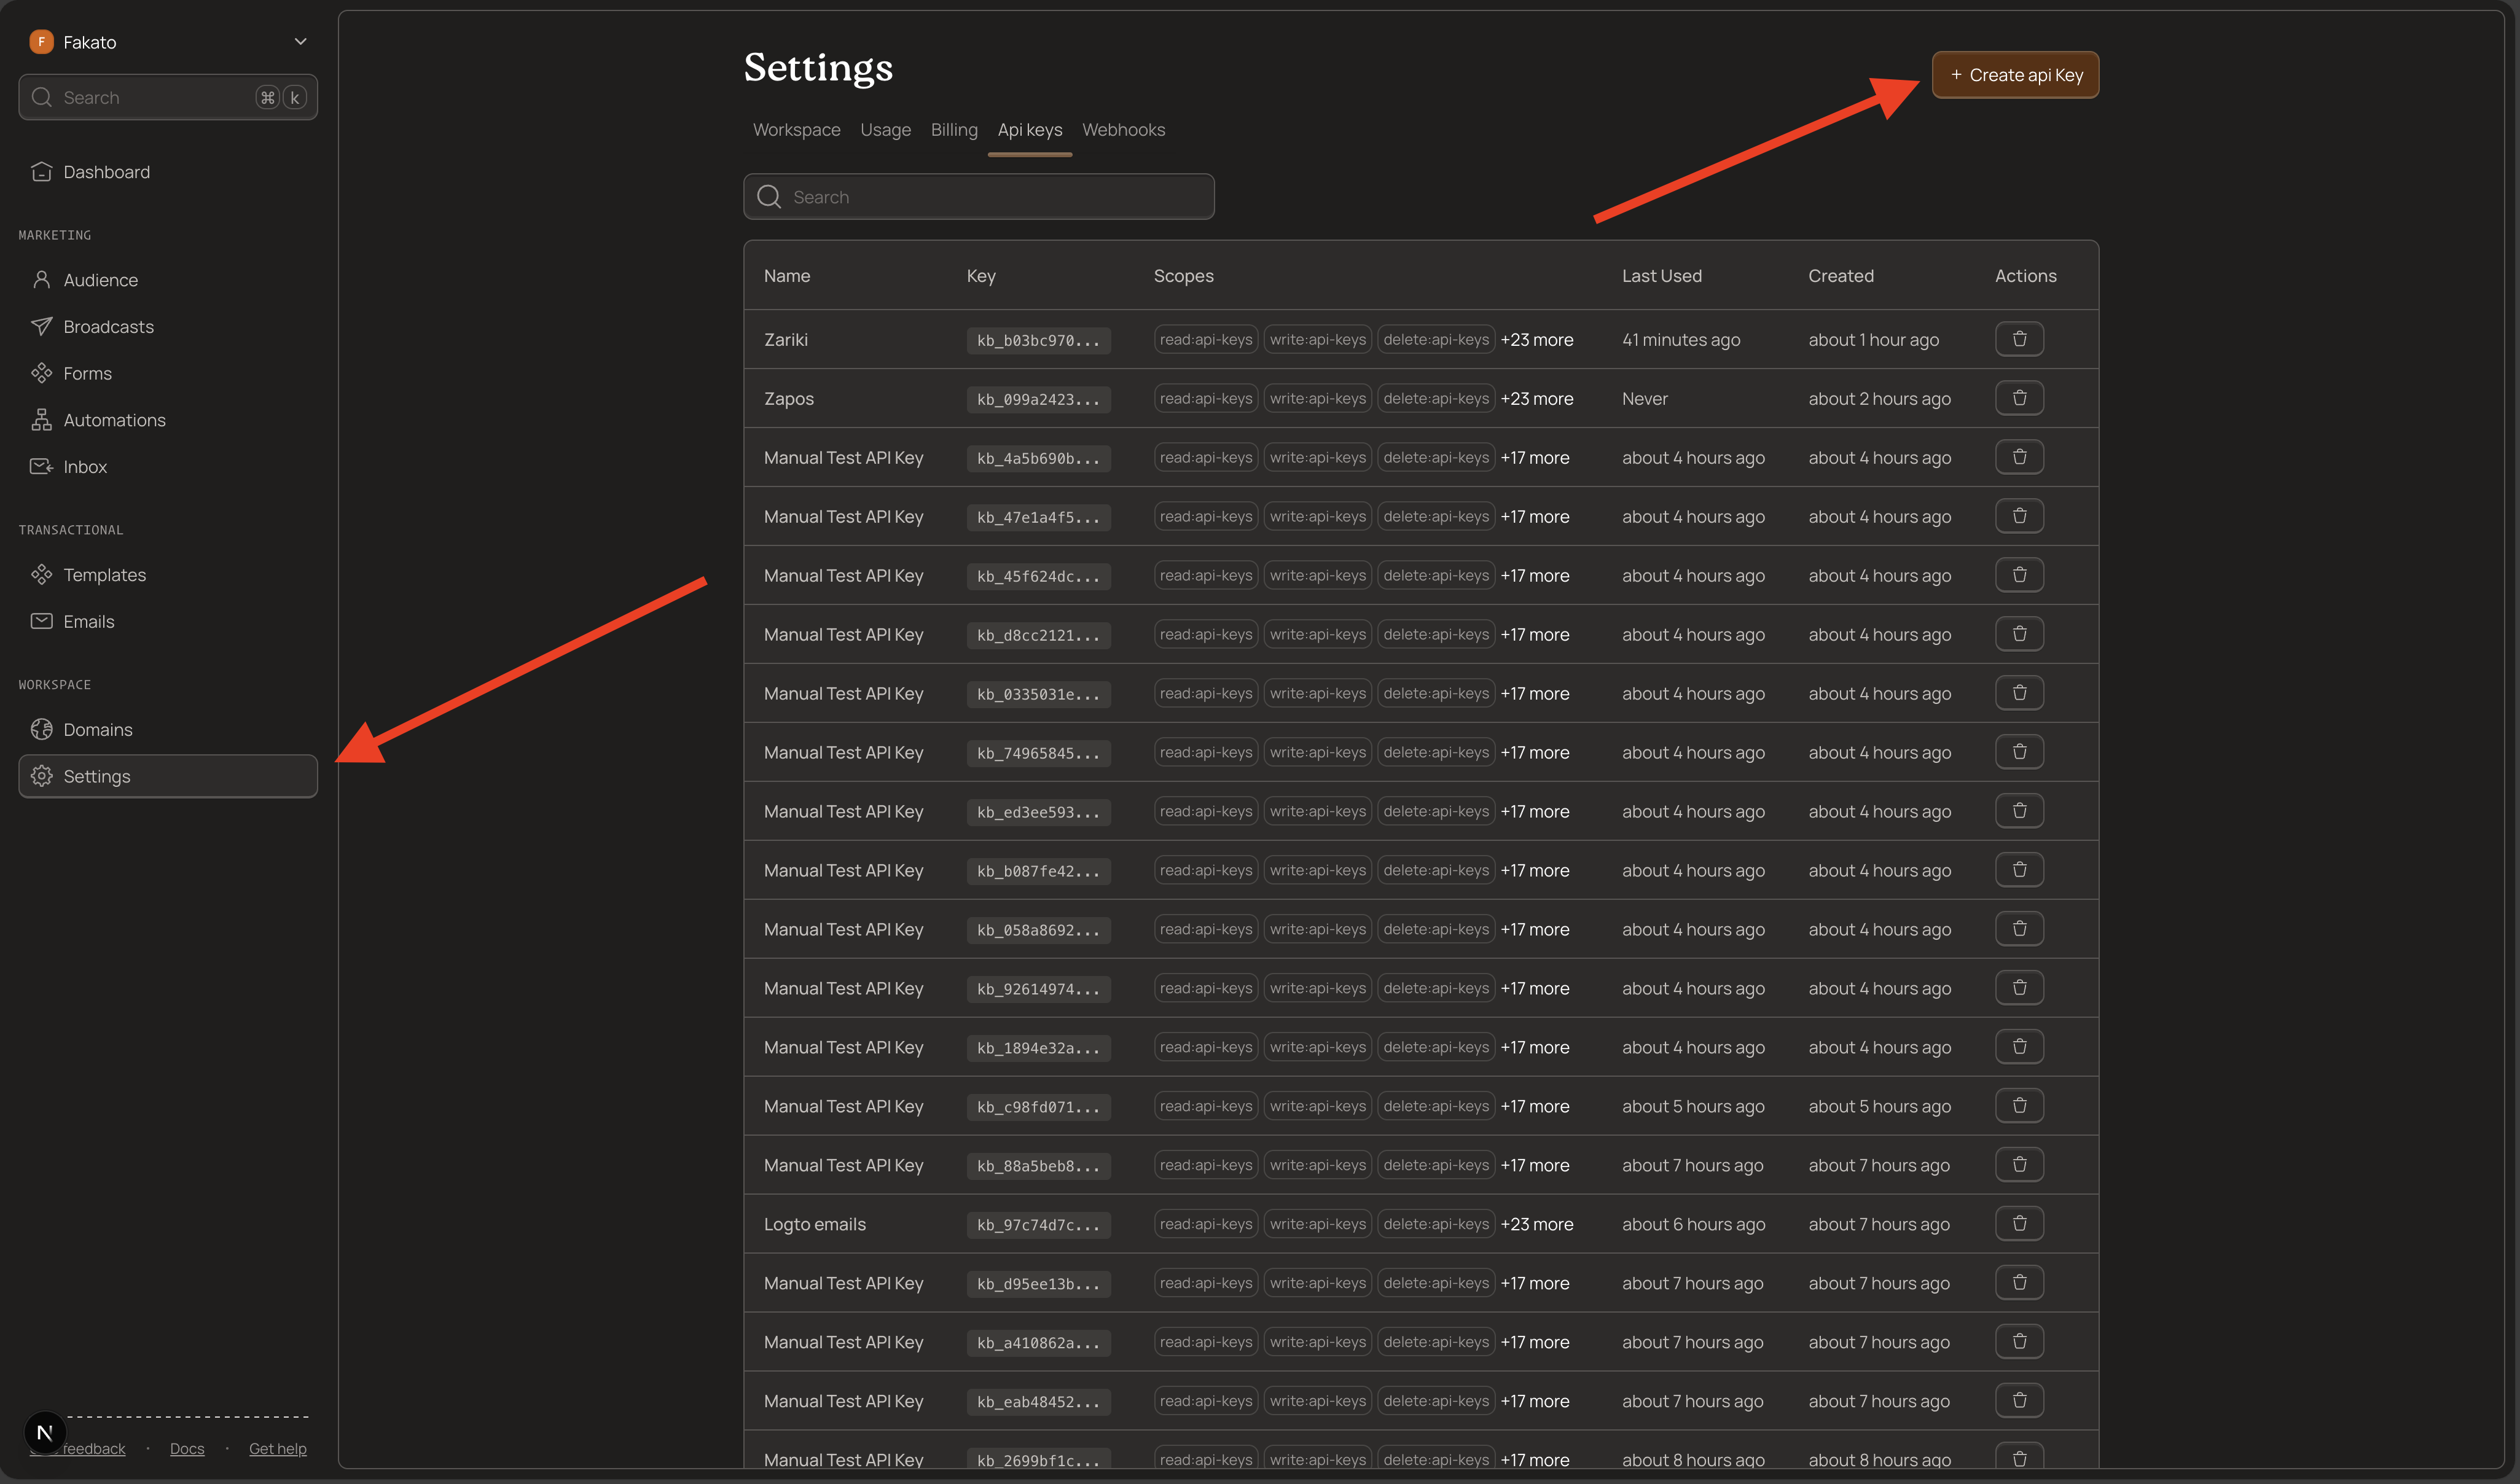
Navigate to API Keys
- Log into your Kibamail dashboard
- Go to Settings → API Keys
- Click Create API Key
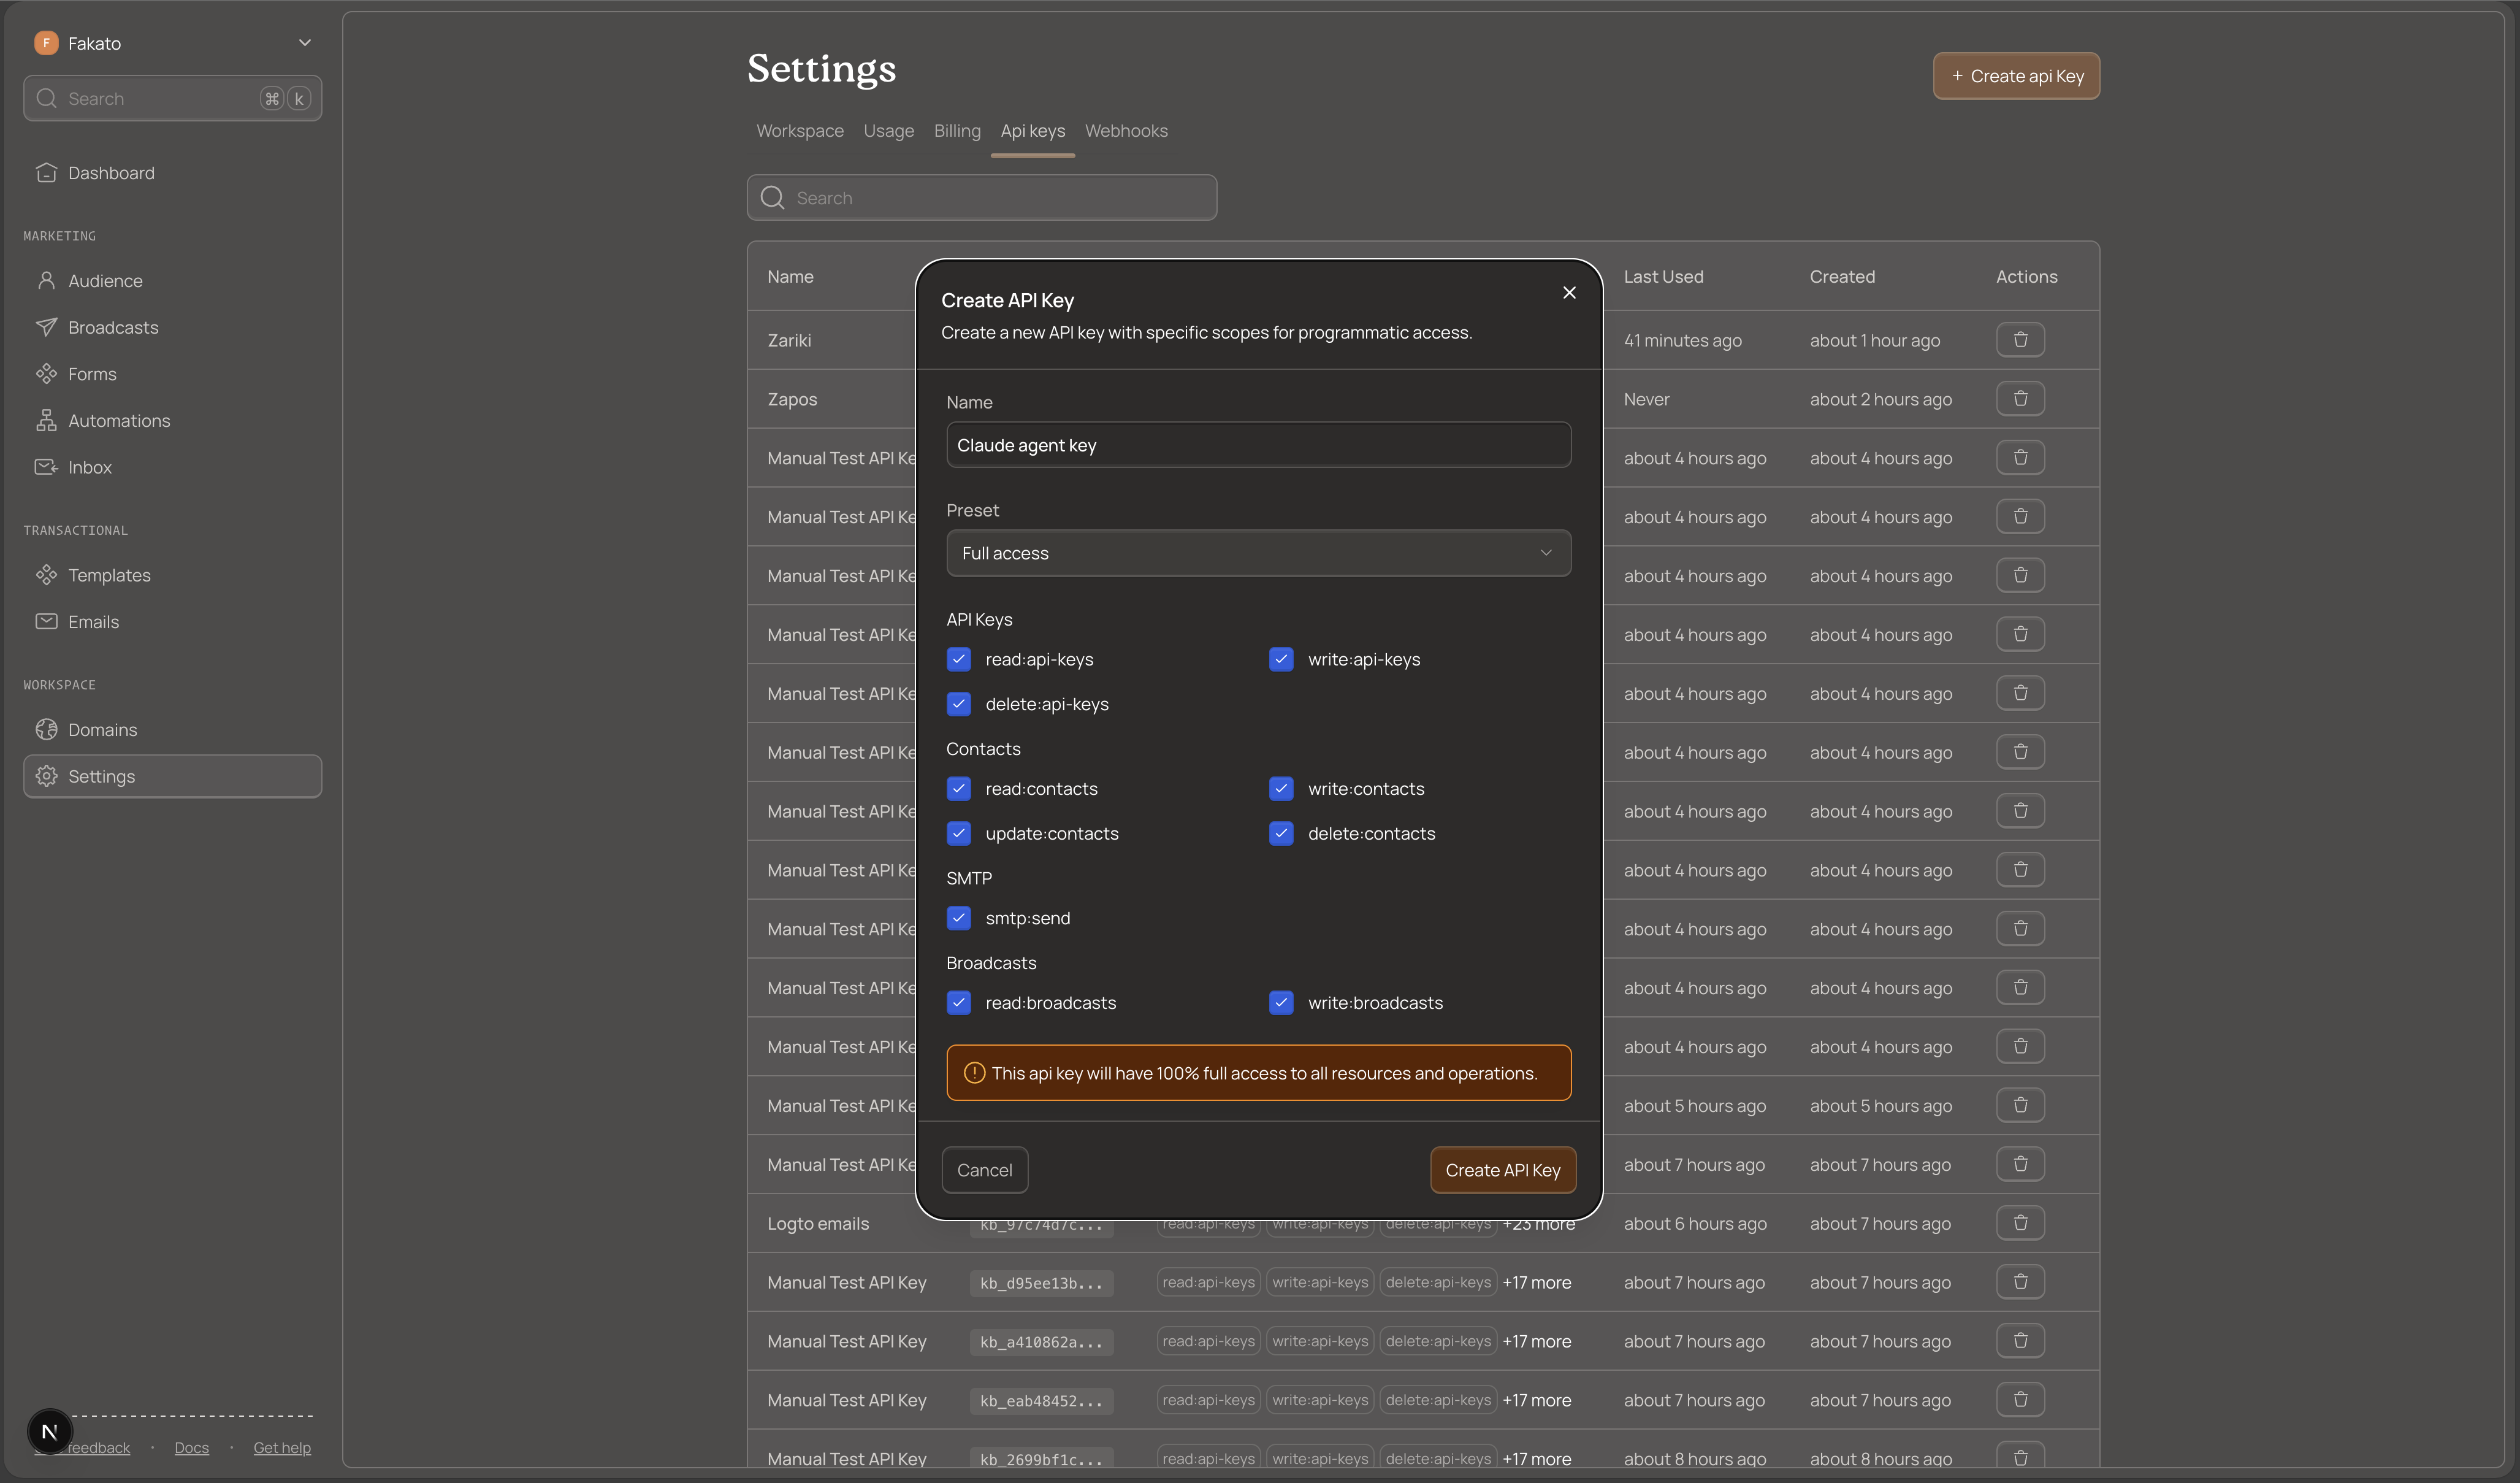
Configure Your Key
Give your key a descriptive name like "Transactional Email Server" or "Order Notifications".
Select the smtp:send scope. This scope grants permission to send transactional emails.
Save Your Key Securely
After creation, Kibamail displays the full key once. It starts with kb_:
kb_live_1234567890abcdefghijklmnopqrstuvwxyzCopy this key immediately and store it securely. You cannot retrieve it again.
Security best practices:
- Store keys in environment variables, never in code
- Never commit keys to version control
- Use separate keys for different environments (development, staging, production)
- Rotate keys every 90 days
Step 2: Install the Node.js SDK
The Kibamail SDK provides a type-safe interface for the API.
Install the Package
npm install kibamailOr with your preferred package manager:
yarn add kibamail
pnpm add kibamail
bun add kibamail
Initialize the Client
import { Kibamail } from "kibamail";

const kibamail = new Kibamail(process.env.KIBAMAIL_API_KEY);
Set your API key in an environment variable:
export KIBAMAIL_API_KEY=kb_live_your_key_hereStep 3: Send Your First Email
The simplest transactional email requires a sender, recipient, subject, and HTML body.
Basic Email
import { Kibamail } from "kibamail";

const kibamail = new Kibamail(process.env.KIBAMAIL_API_KEY);

async function sendWelcomeEmail(userEmail: string, userName: string) {
  const { data, error } = await kibamail.emails.send({
    from: "welcome@yourdomain.com",
    to: userEmail,
    subject: `Welcome to Our Platform, ${userName}!`,
    html: `
      <h1>Welcome, ${userName}!</h1>
      <p>Thanks for creating an account. We're excited to have you.</p>
      <p>Get started by exploring your dashboard.</p>
    `,
  });

  if (error) {
    console.error("Failed to send email:", error.message);
    return null;
  }

  console.log("Email sent:", data.id);
  return data.id;
}

// Usage
sendWelcomeEmail("newuser@example.com", "John");
The API queues the email and returns immediately with an email ID. Use this ID to track delivery status via webhooks.
Step 4: Send to Multiple Recipients
Send the same email to multiple addresses by passing an array:
const { data, error } = await kibamail.emails.send({
  from: "alerts@yourdomain.com",
  to: ["admin1@example.com", "admin2@example.com", "admin3@example.com"],
  subject: "System Alert: Server Maintenance",
  html: "<p>Scheduled maintenance will occur tonight at 2 AM UTC.</p>",
});
All recipients receive the same email. For personalized emails to multiple recipients, use broadcasts instead.
Step 5: Use Templates
Templates separate email design from application code. Create templates in your Kibamail dashboard, then reference them by their unique identifier.
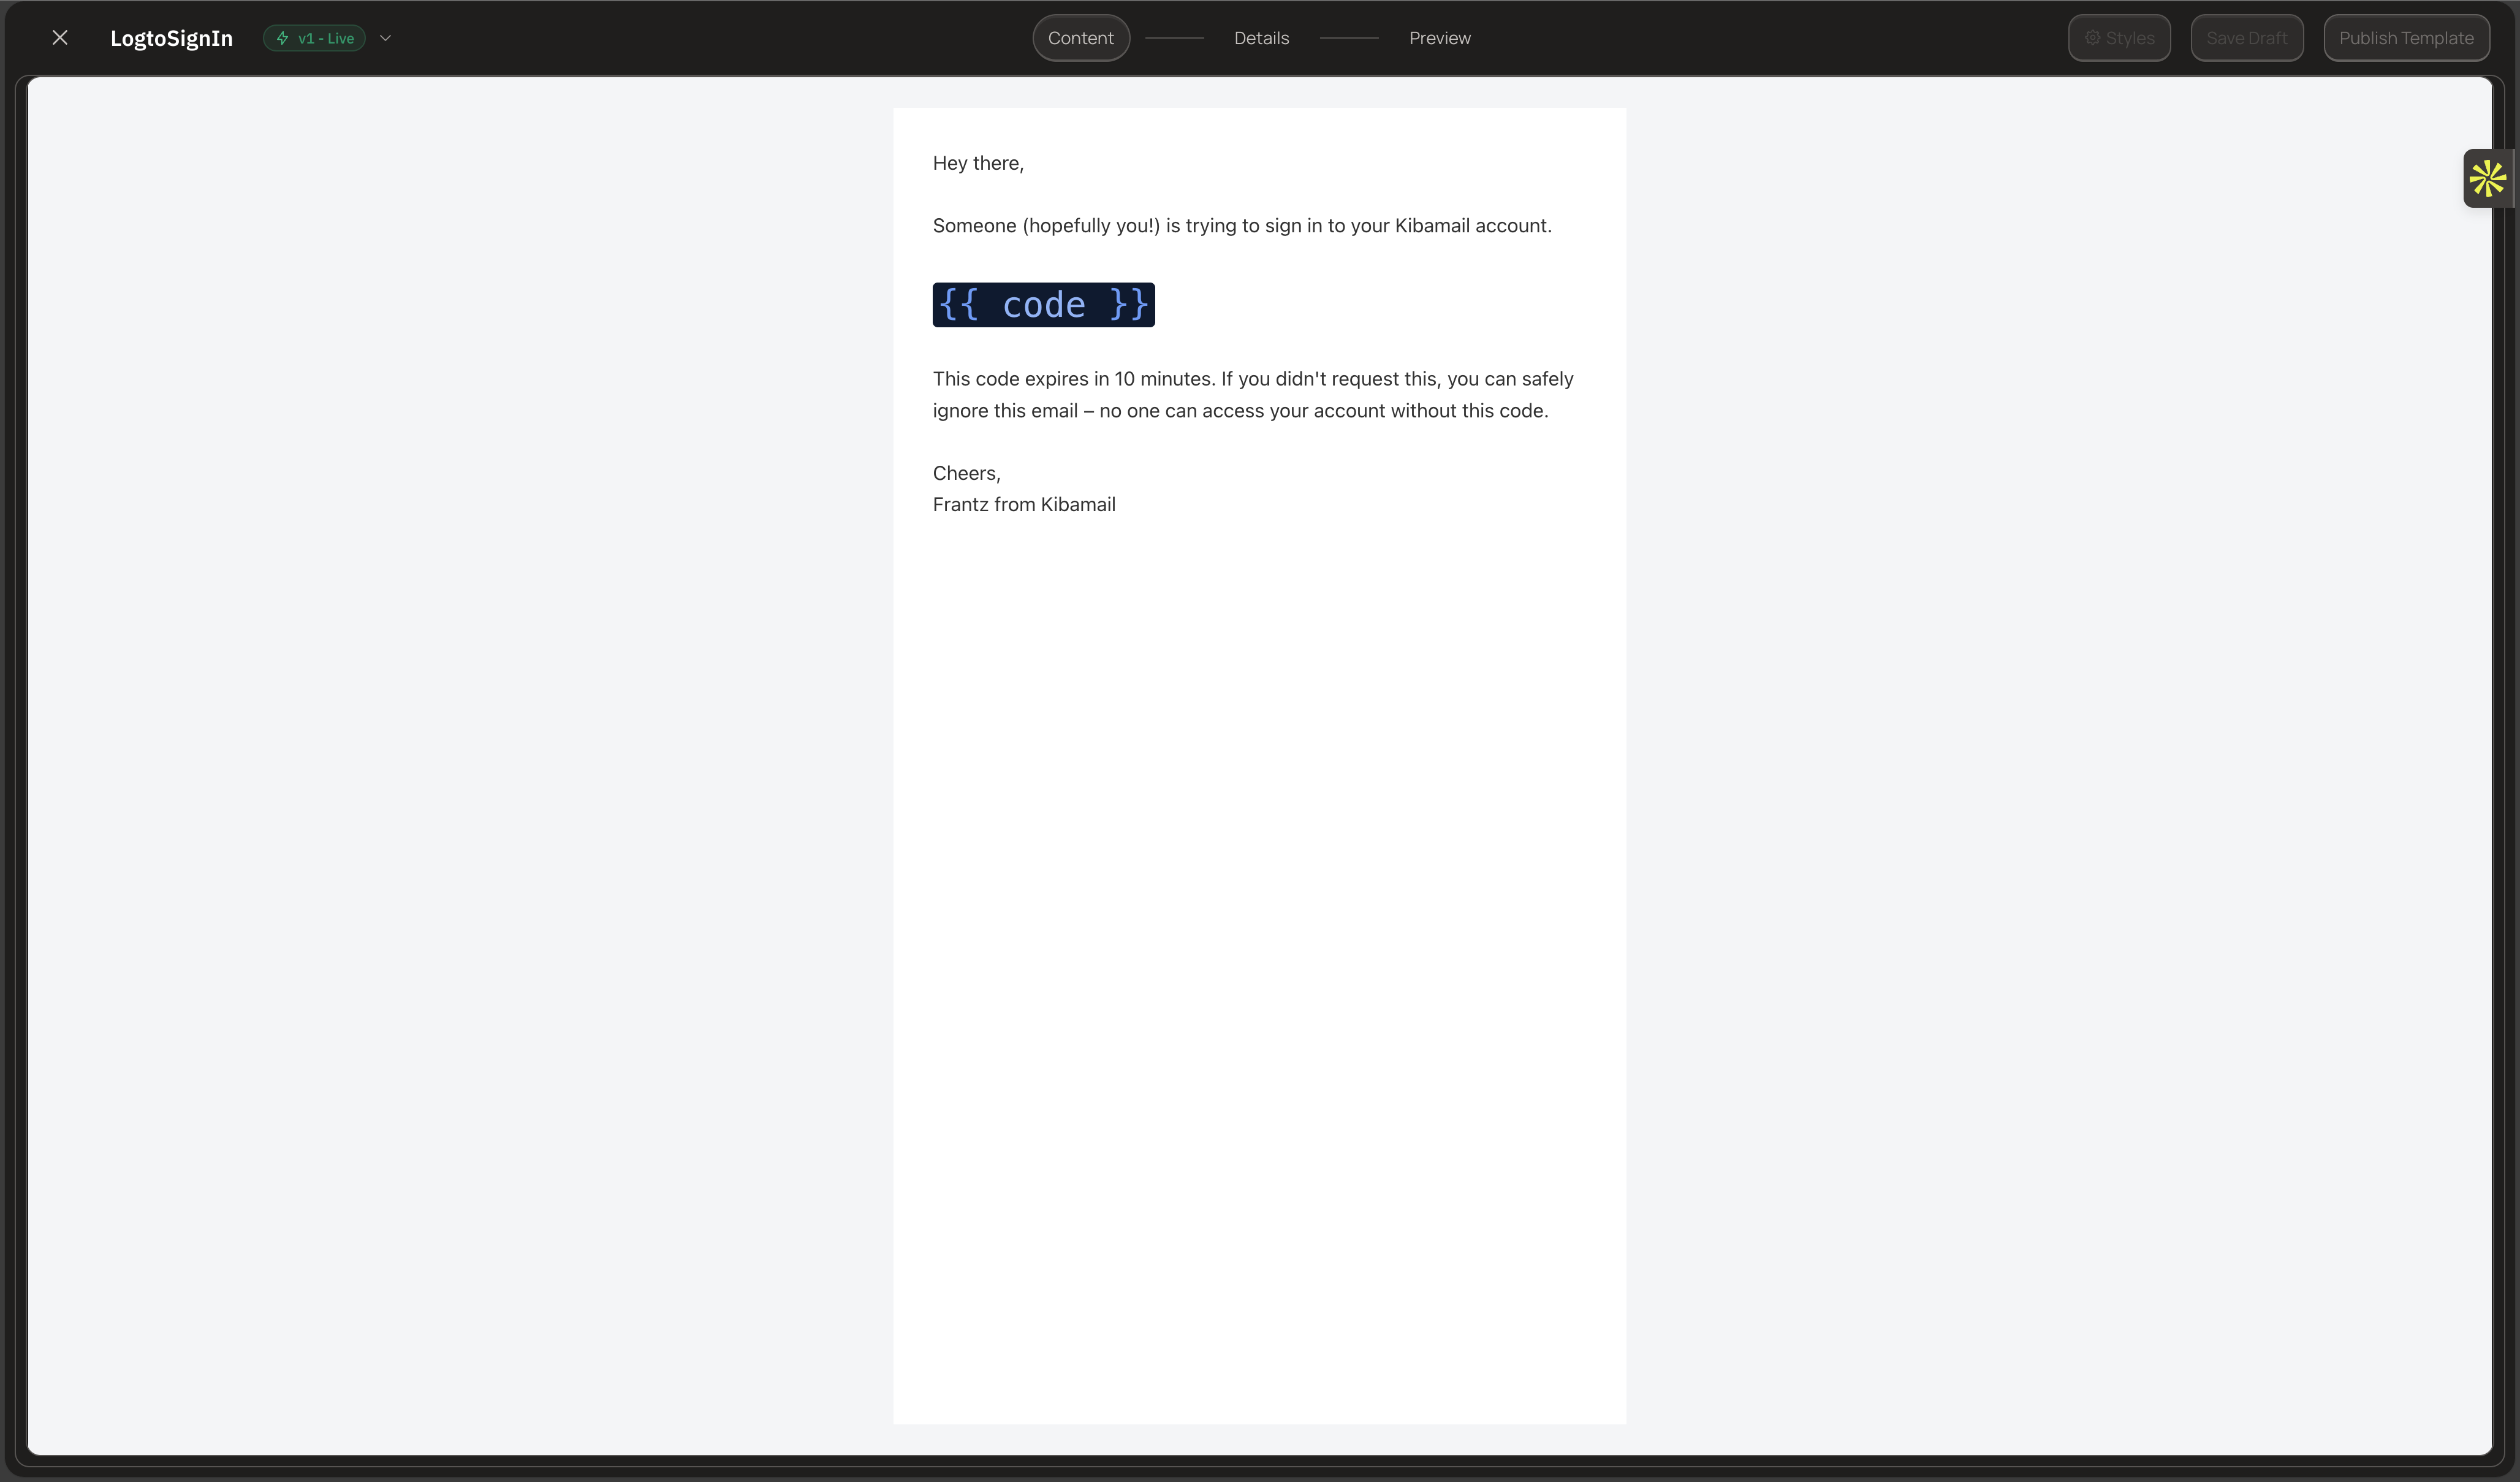
Create a Template
- Go to Content → Templates in your dashboard
- Click Create Template
- Design your email using the visual editor or HTML
- Set a unique slug like
order_confirmation - Add variables using
{{variableName}}syntax - Publish the template
Send with a Template
const { data, error } = await kibamail.emails.send({
  from: "orders@yourdomain.com",
  to: "customer@example.com",
  template: {
    id: "order_confirmation",
    variables: {
      firstName: "John",
      orderNumber: "ORD-12345",
      orderTotal: 99.99,
      estimatedDelivery: "January 20, 2025",
    },
  },
});
The template defines the subject, HTML, and preview text. Variables are substituted at send time.
Override Template Subject
Override the template's subject line when needed:
const { data, error } = await kibamail.emails.send({
  from: "orders@yourdomain.com",
  to: "customer@example.com",
  subject: "Order #ORD-12345 Confirmed - Custom Subject",
  template: {
    id: "order_confirmation",
    variables: {
      firstName: "John",
      orderNumber: "ORD-12345",
      orderTotal: 99.99,
    },
  },
});
Step 6: Add a Custom Reply-To
Direct replies to a different address than the sender:
const { data, error } = await kibamail.emails.send({
  from: "noreply@yourdomain.com",
  to: "customer@example.com",
  subject: "Your Support Ticket #1234",
  html: "<p>We received your support request and will respond shortly.</p>",
  replyTo: {
    email: "support@yourdomain.com",
    name: "Support Team",
  },
});
When the recipient clicks reply, their email client addresses the response to the support team, not the noreply address.
Step 7: Include Attachments
Attach files to your emails. Files must be base64-encoded.
import { readFileSync } from "fs";

// Read and encode the file
const invoicePdf = readFileSync("./invoice-12345.pdf");
const base64Content = invoicePdf.toString("base64");

const { data, error } = await kibamail.emails.send({
  from: "billing@yourdomain.com",
  to: "customer@example.com",
  subject: "Your Invoice #12345",
  html: "<p>Please find your invoice attached.</p>",
  attachments: [
    {
      filename: "invoice-12345.pdf",
      content: base64Content,
      contentType: "application/pdf",
    },
  ],
});
Attachment Limits
- Maximum 25 files per email
- Maximum 25 MB total size
- Common content types:
application/pdf,image/png,image/jpeg,text/csv
Multiple Attachments
const { data, error } = await kibamail.emails.send({
  from: "reports@yourdomain.com",
  to: "manager@example.com",
  subject: "Monthly Reports",
  html: "<p>Attached are the monthly reports.</p>",
  attachments: [
    {
      filename: "sales-report.pdf",
      content: salesReportBase64,
      contentType: "application/pdf",
    },
    {
      filename: "analytics.csv",
      content: analyticsBase64,
      contentType: "text/csv",
    },
    {
      filename: "chart.png",
      content: chartBase64,
      contentType: "image/png",
    },
  ],
});
Step 8: Track with Metadata
Attach custom metadata to emails for tracking and analytics. Metadata appears in webhooks and helps correlate emails with your application data.
const { data, error } = await kibamail.emails.send({
  from: "orders@yourdomain.com",
  to: "customer@example.com",
  subject: "Order Shipped!",
  html: "<p>Your order has shipped!</p>",
  metadata: {
    orderId: "order_12345",
    customerId: "cust_67890",
    campaign: "shipping_notification",
    environment: "production",
  },
});
When you receive delivery webhooks, the metadata is included. This makes it easy to update your database with delivery status.
Step 9: Handle Errors
The SDK returns errors in a consistent format. Always check for errors before using response data:
const { data, error } = await kibamail.emails.send({
  from: "notifications@yourdomain.com",
  to: "user@example.com",
  subject: "Test Email",
  html: "<p>Hello!</p>",
});

if (error) {
  console.error(`Error [${error.code}]: ${error.message}`);
  console.error("Request ID:", error.requestId);

  // Handle validation errors
  if (error.type === "validation_error" && error.validationErrors) {
    for (const fieldError of error.validationErrors) {
      console.error(`  ${fieldError.field}: ${fieldError.message}`);
    }
  }

  return;
}

// Success
console.log("Email ID:", data.id);
Common Errors
| Error Code | Cause | Solution |
|---|---|---|
INVALID_API_KEY |
Missing or invalid API key | Check your environment variable |
INSUFFICIENT_SCOPES |
Key lacks smtp:send scope |
Create a new key with correct scopes |
DOMAIN_NOT_VERIFIED |
Sending domain not verified | Verify your domain in settings |
TEMPLATE_NOT_FOUND |
Template identifier not found | Check the template slug |
TEMPLATE_NOT_PUBLISHED |
Template exists but not published | Publish the template |
ATTACHMENT_TOO_LARGE |
Attachments exceed 25 MB | Reduce attachment sizes |
Step 10: Inspect Sent Emails in the Dashboard
After sending emails, you can inspect them in your Kibamail dashboard. This helps you debug delivery issues, verify email content, and track engagement.
View All Sent Emails
- Log into your Kibamail dashboard
- Go to Emails in the main navigation
- You'll see a list of all transactional emails sent from your workspace
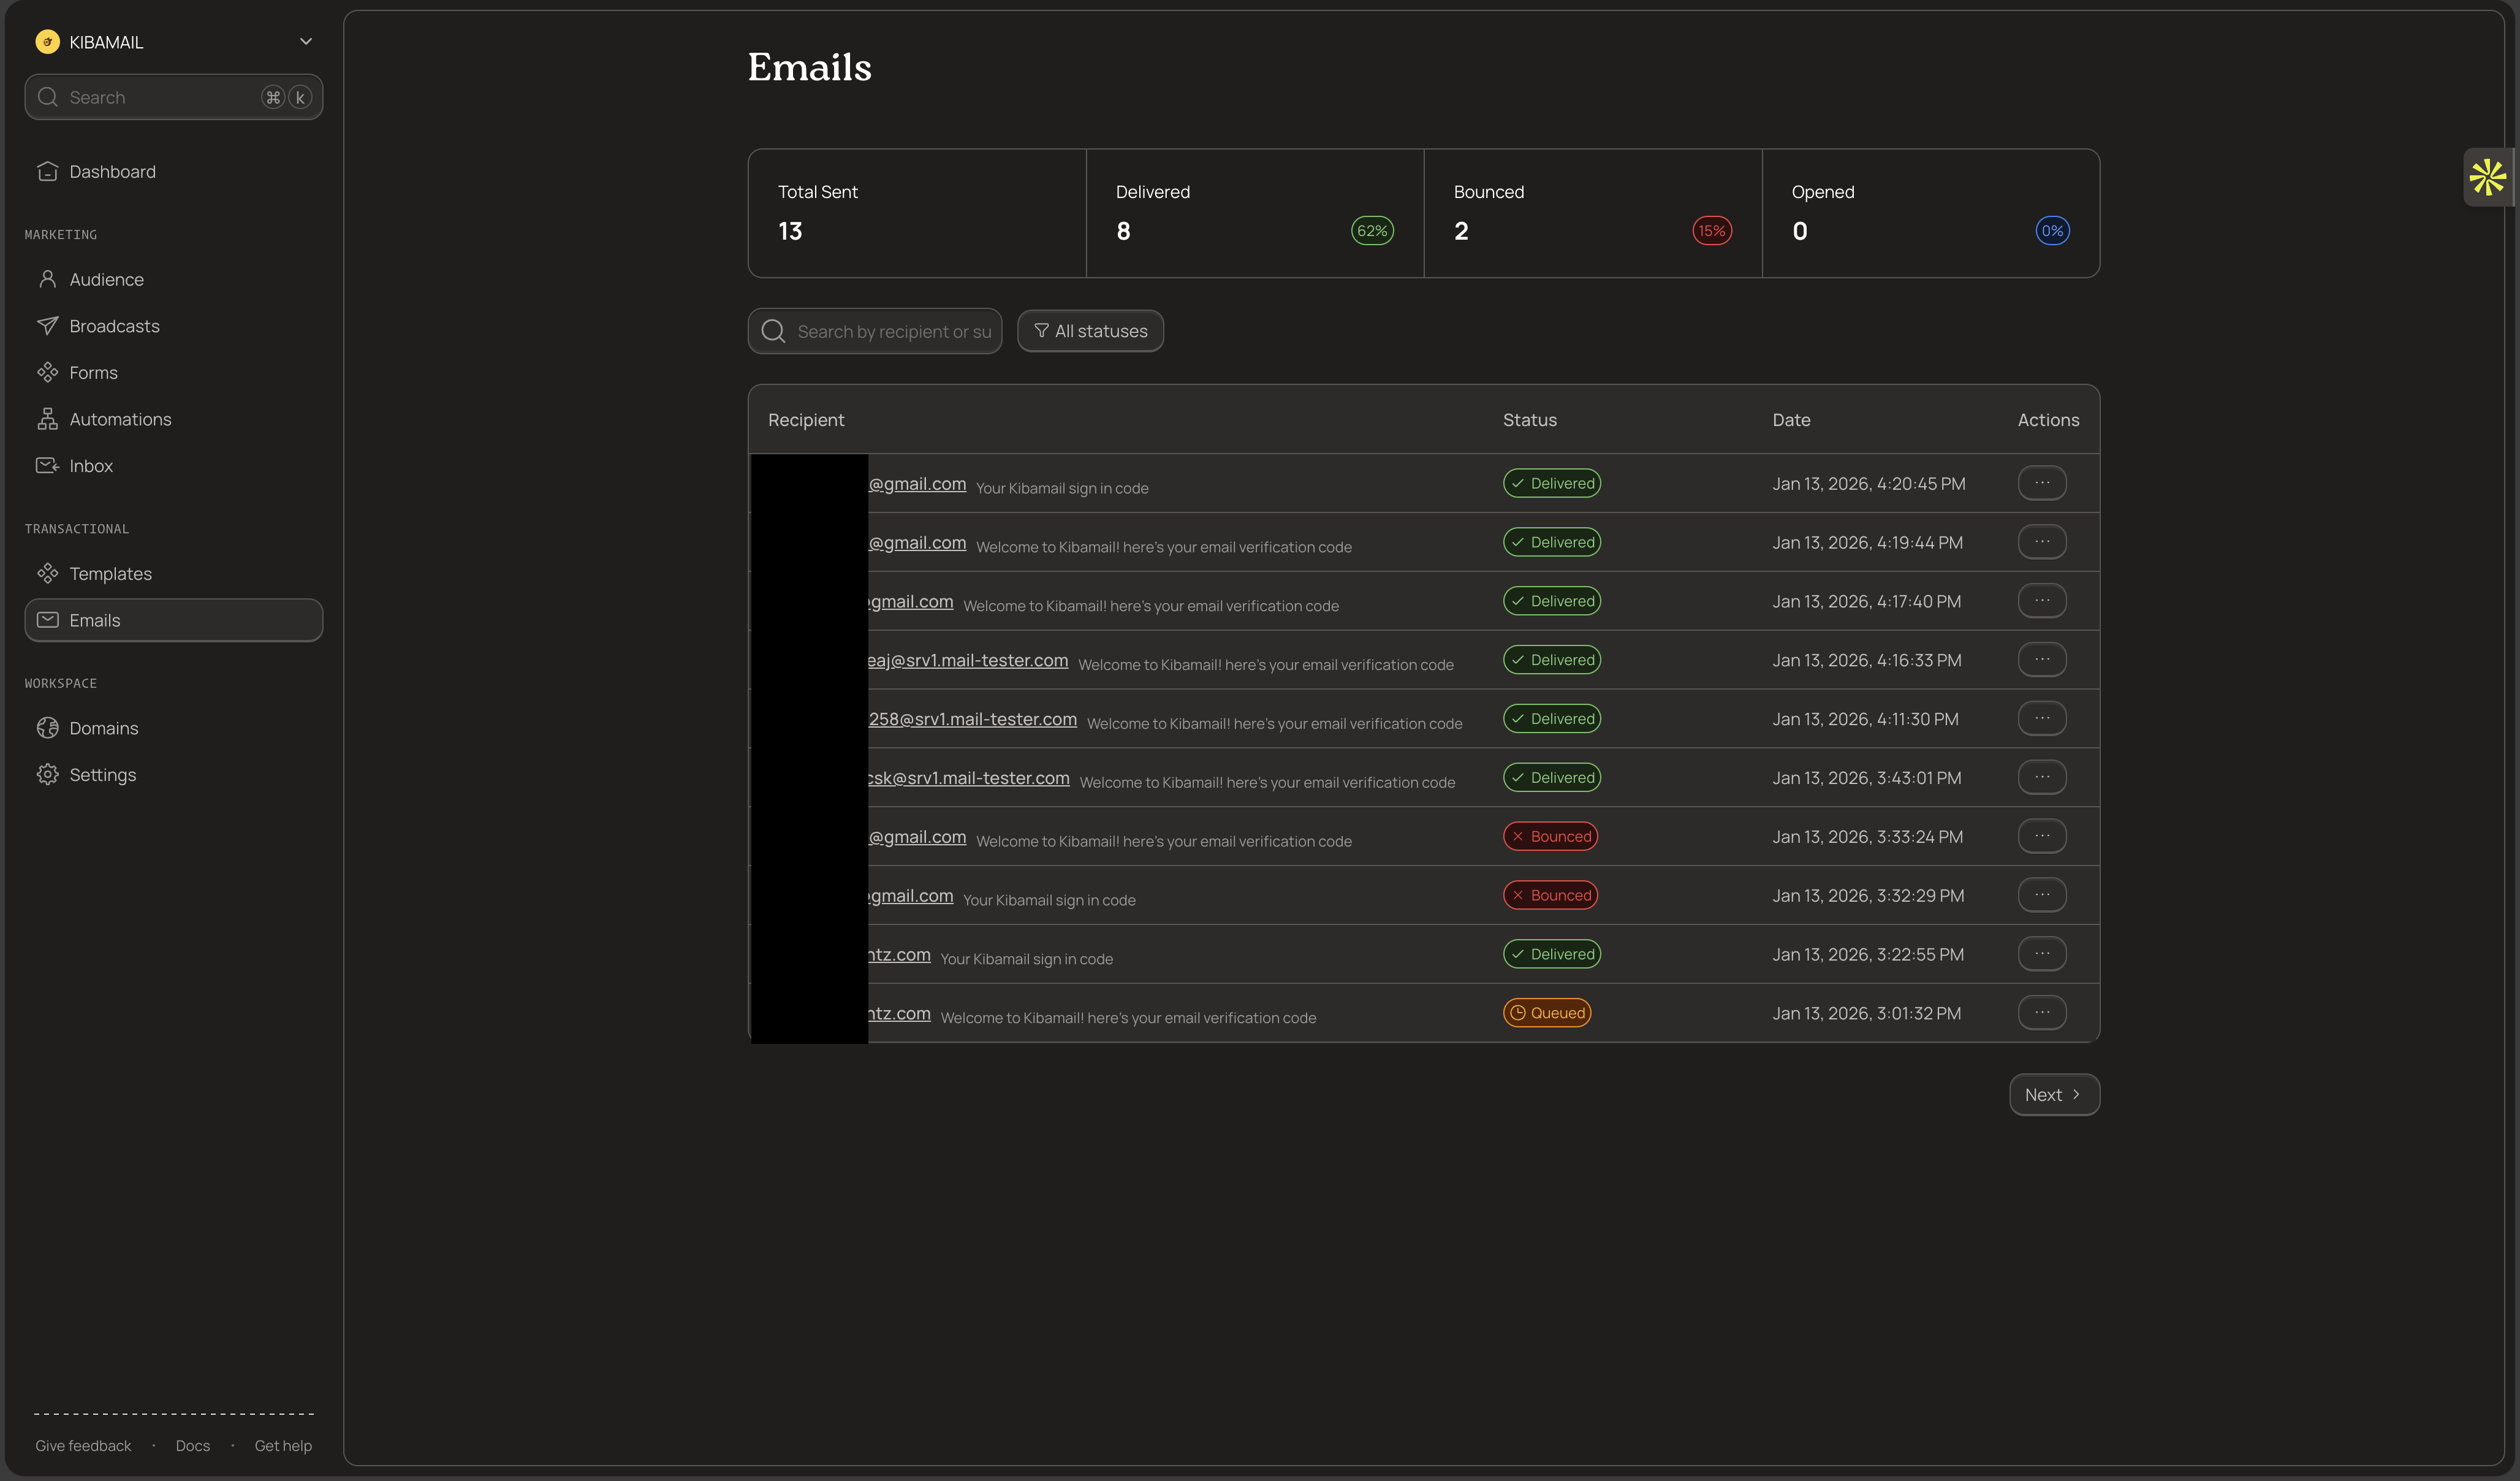
The list displays each email's recipient, subject, status, and timestamp. Use the search and filters to find specific emails.
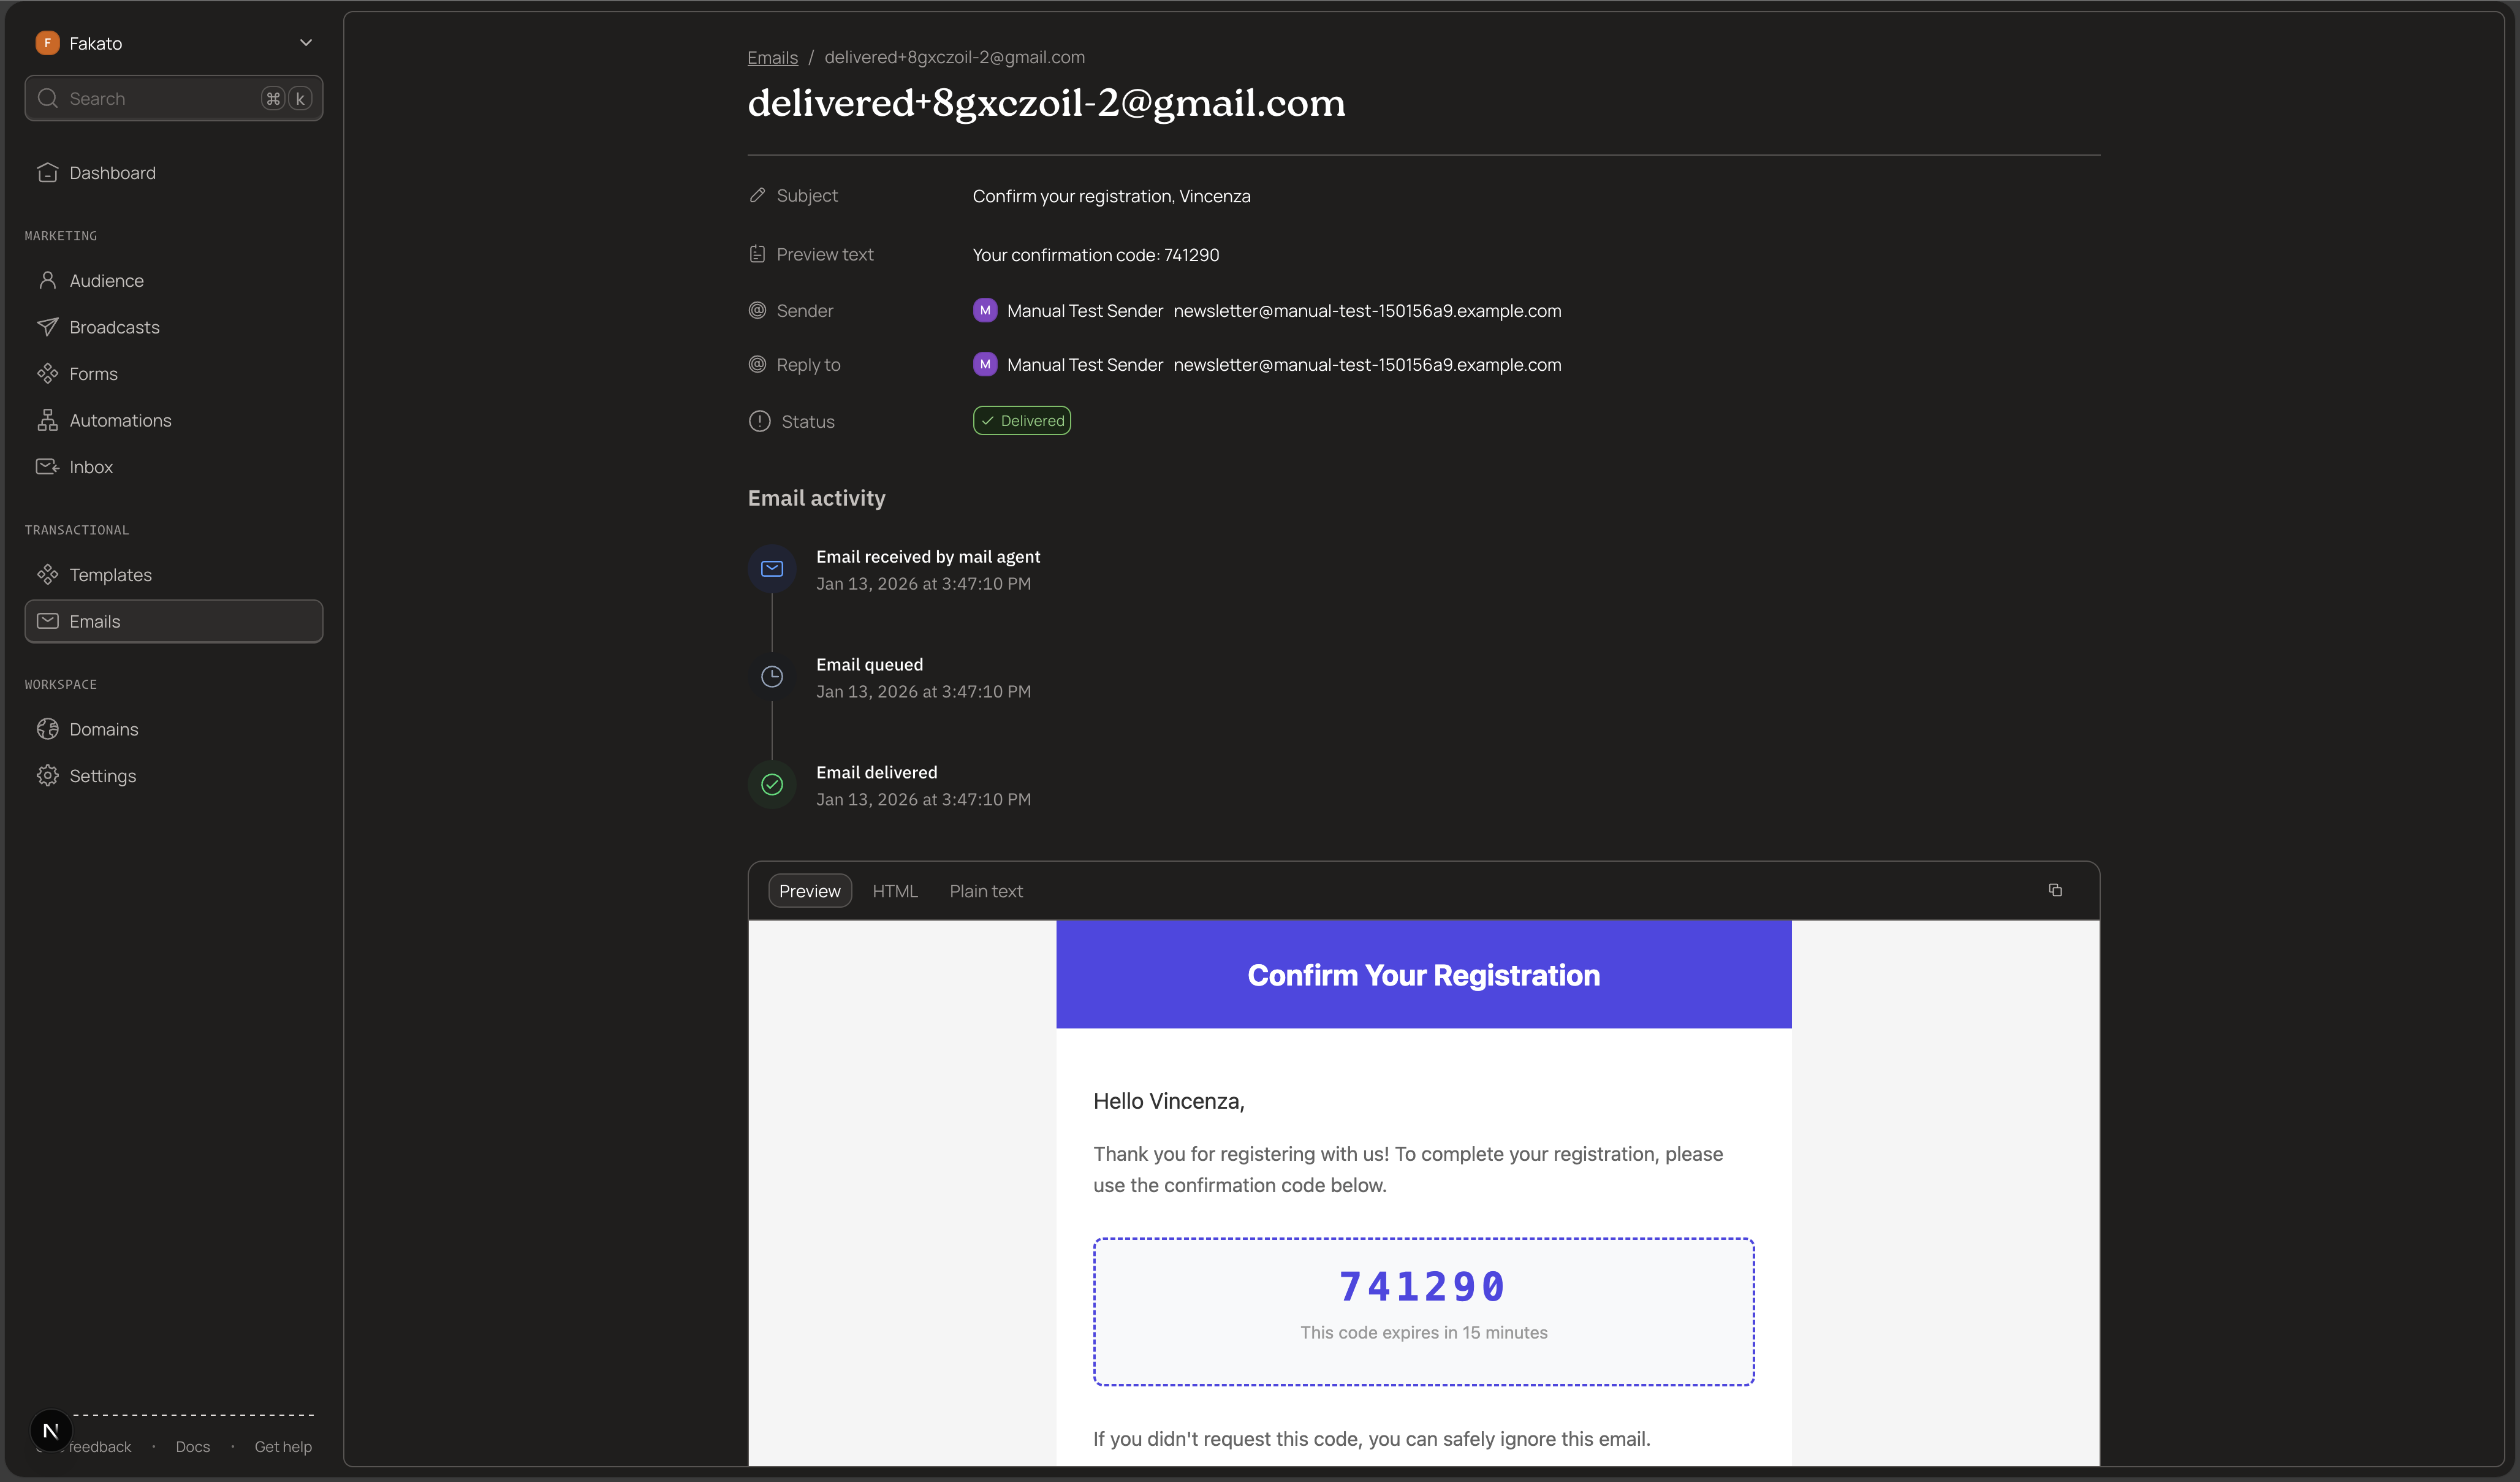
View Email Details
Click on any email to open its detail view. Here you can see:
- Recipient and sender information - Who the email was sent to and from
- Subject and preview text - The email's subject line
- Metadata - Any custom metadata you attached when sending
- Current status - Whether the email was delivered, bounced, or is still pending
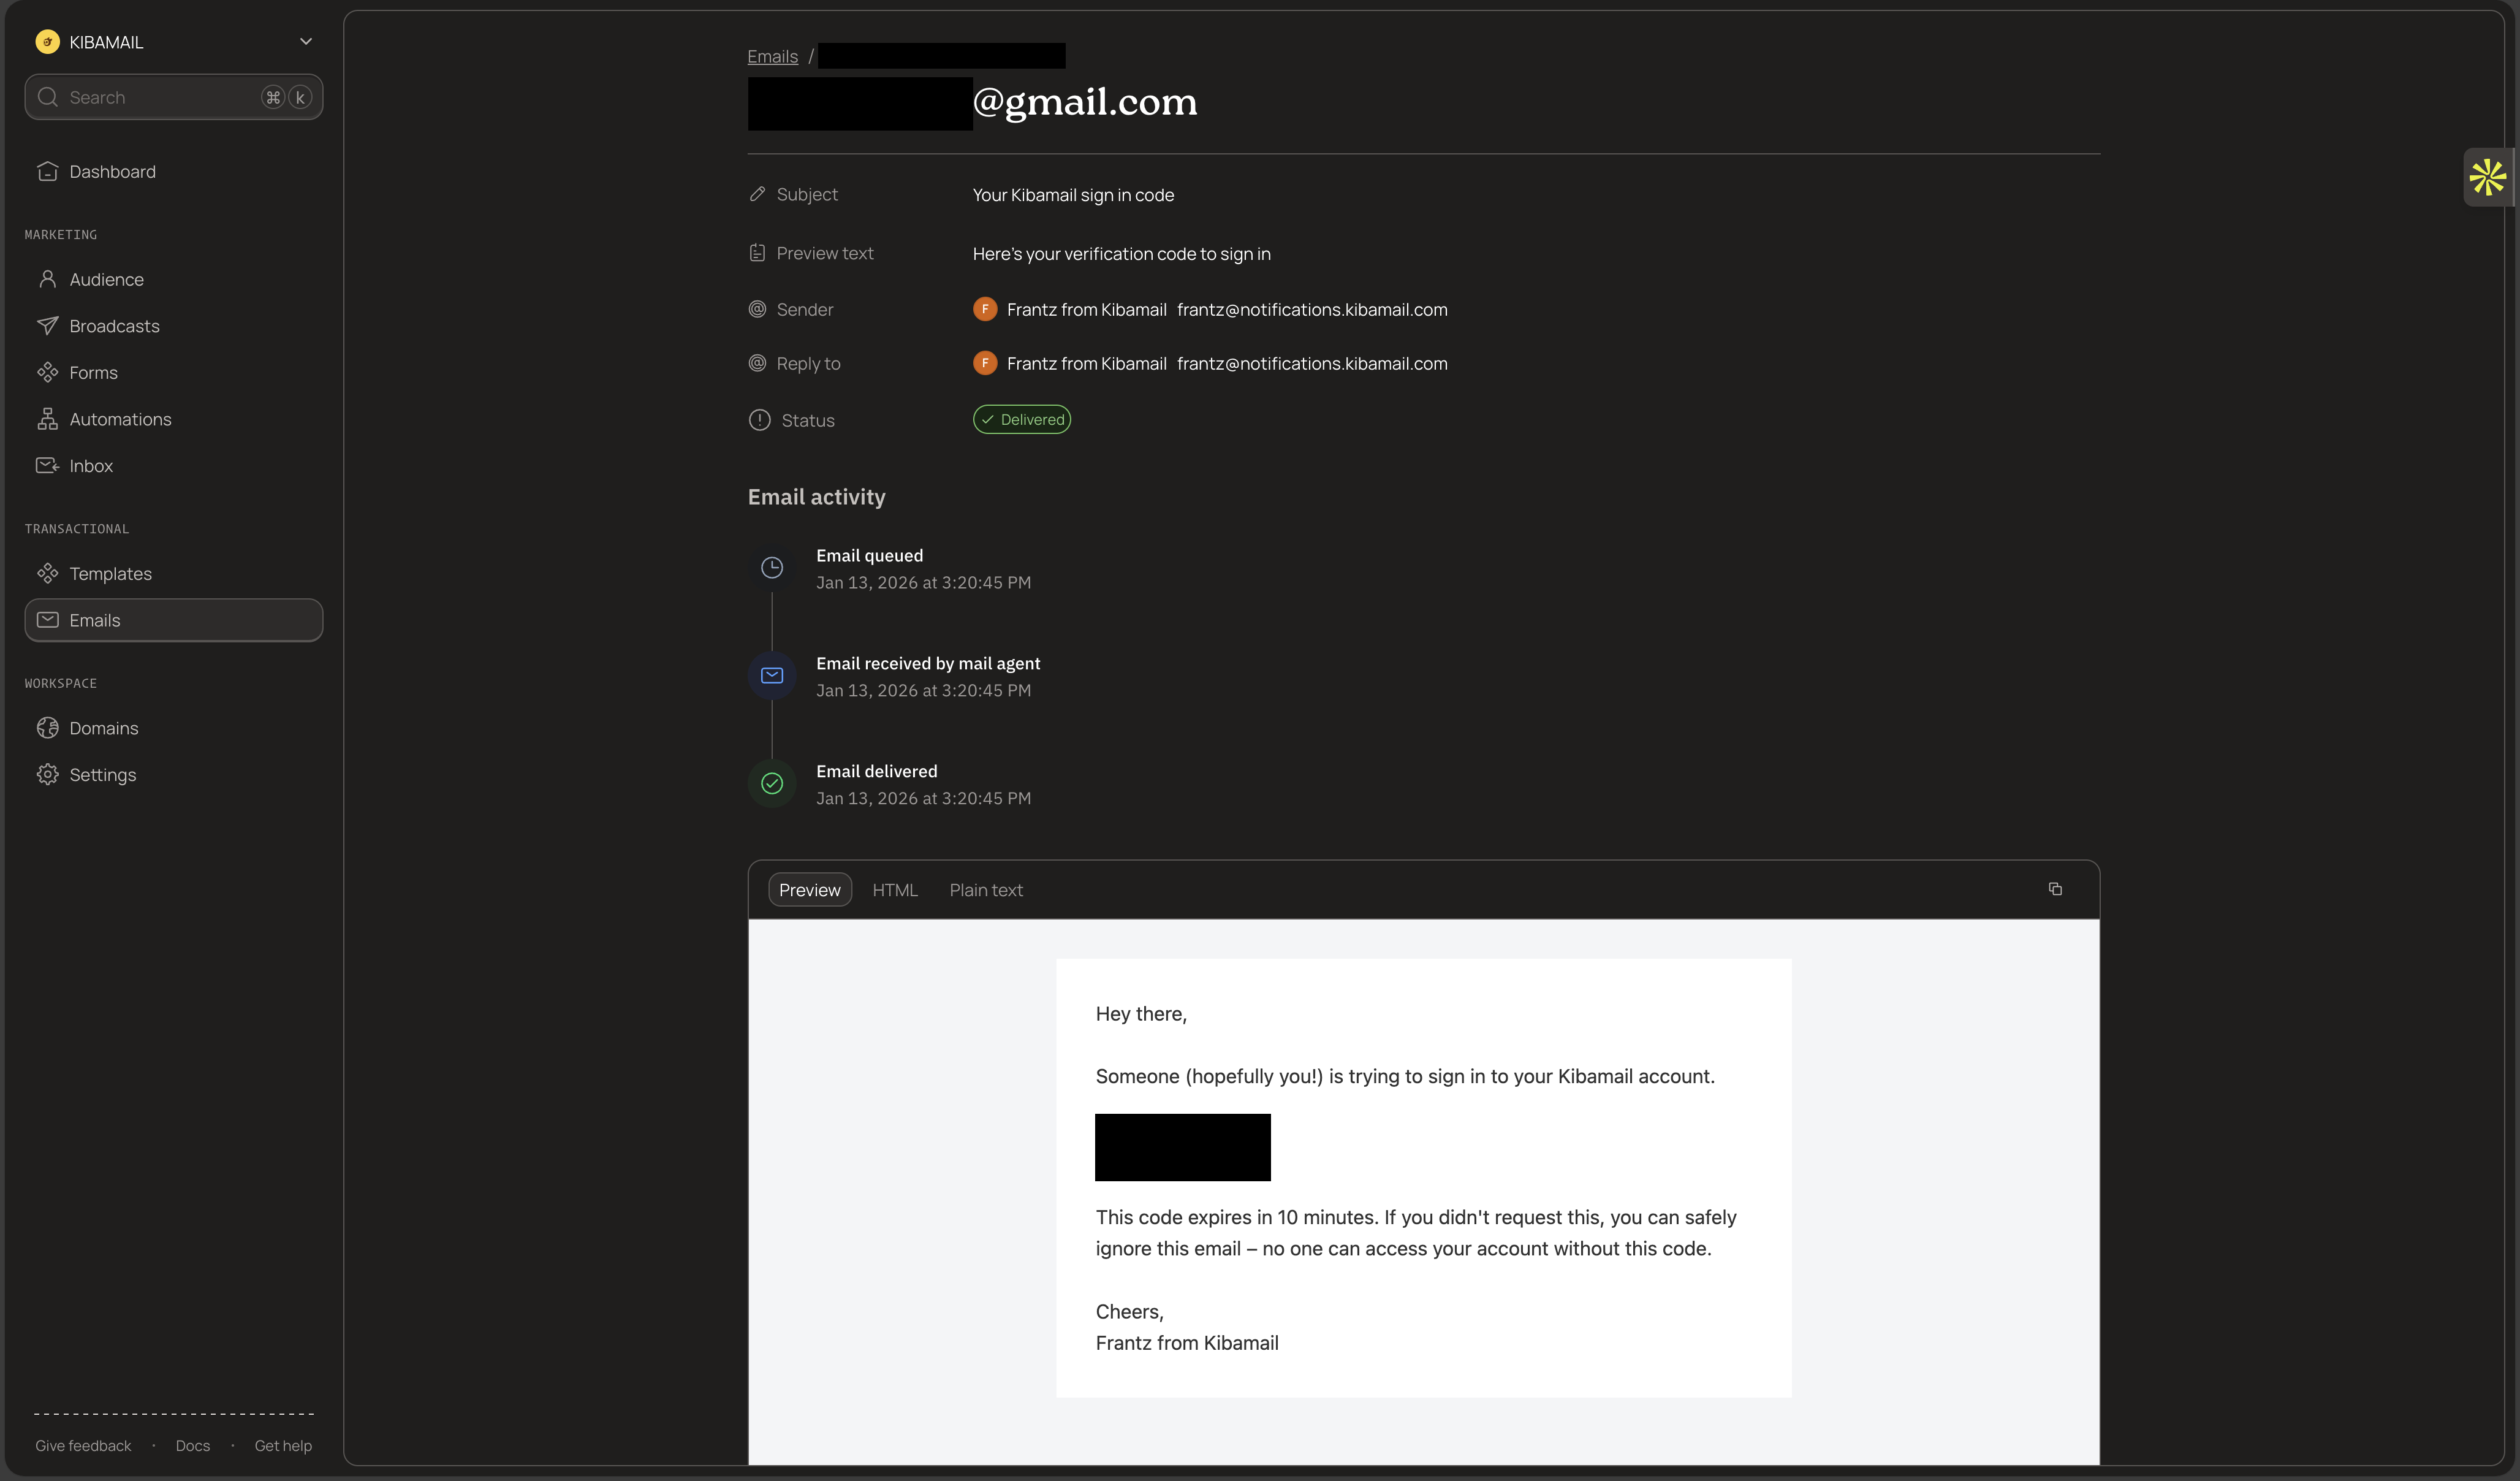
Event Timeline
Each email has a timeline showing every event that occurred:
| Event | Description |
|---|---|
| Queued | Email accepted by Kibamail and queued for sending |
| Sent | Email handed off to the receiving mail server |
| Delivered | Receiving server accepted the email |
| Opened | Recipient opened the email (if tracking enabled) |
| Clicked | Recipient clicked a link (if tracking enabled) |
| Bounced | Email bounced (hard or soft bounce) |
| Complained | Recipient marked as spam |
The timeline shows the exact timestamp for each event, making it easy to diagnose delivery delays or issues.
Preview Email Content
Click the Preview tab to see exactly what the recipient received. This renders the full HTML email as it appeared in the recipient's inbox.
Use this to verify:
- Variable substitution worked correctly
- HTML renders as expected
- Links and images display properly
Complete Examples
Password Reset Email
import { Kibamail } from "kibamail";

const kibamail = new Kibamail(process.env.KIBAMAIL_API_KEY);

interface PasswordResetParams {
  userEmail: string;
  userName: string;
  resetToken: string;
  expiresInMinutes: number;
}

async function sendPasswordReset(params: PasswordResetParams) {
  const resetLink = `https://yourapp.com/reset-password?token=${params.resetToken}`;

  const { data, error } = await kibamail.emails.send({
    from: "security@yourdomain.com",
    to: params.userEmail,
    subject: "Reset Your Password",
    html: `
      <h1>Password Reset Request</h1>
      <p>Hi ${params.userName},</p>
      <p>We received a request to reset your password. Click the link below:</p>
      <p><a href="${resetLink}">Reset Password</a></p>
      <p>This link expires in ${params.expiresInMinutes} minutes.</p>
      <p>If you didn't request this, ignore this email.</p>
    `,
    replyTo: {
      email: "support@yourdomain.com",
      name: "Support Team",
    },
    metadata: {
      type: "password_reset",
      userId: params.userEmail,
    },
  });

  if (error) {
    throw new Error(`Failed to send password reset: ${error.message}`);
  }

  return data.id;
}

// Usage
sendPasswordReset({
  userEmail: "user@example.com",
  userName: "John",
  resetToken: "abc123xyz",
  expiresInMinutes: 60,
});
Order Confirmation with Invoice
import { Kibamail } from "kibamail";
import { readFileSync } from "fs";

const kibamail = new Kibamail(process.env.KIBAMAIL_API_KEY);

interface OrderItem {
  name: string;
  quantity: number;
  price: number;
}

interface OrderConfirmationParams {
  customerEmail: string;
  customerName: string;
  orderNumber: string;
  items: OrderItem[];
  total: number;
  invoicePath: string;
}

async function sendOrderConfirmation(params: OrderConfirmationParams) {
  const itemsHtml = params.items
    .map(
      (item) =>
        `<li>${item.name} x ${item.quantity} - $${item.price.toFixed(2)}</li>`
    )
    .join("");

  const invoicePdf = readFileSync(params.invoicePath);

  const { data, error } = await kibamail.emails.send({
    from: "orders@yourdomain.com",
    to: params.customerEmail,
    subject: `Order Confirmation #${params.orderNumber}`,
    html: `
      <h1>Thank you for your order!</h1>
      <p>Hi ${params.customerName},</p>
      <p>We've received your order #${params.orderNumber}.</p>
      <h2>Order Summary</h2>
      <ul>${itemsHtml}</ul>
      <p><strong>Total: $${params.total.toFixed(2)}</strong></p>
      <p>Your invoice is attached.</p>
    `,
    attachments: [
      {
        filename: `invoice-${params.orderNumber}.pdf`,
        content: invoicePdf.toString("base64"),
        contentType: "application/pdf",
      },
    ],
    metadata: {
      type: "order_confirmation",
      orderId: params.orderNumber,
      customerEmail: params.customerEmail,
    },
  });

  if (error) {
    throw new Error(`Failed to send order confirmation: ${error.message}`);
  }

  return data.id;
}
API Reference
Endpoint: POST /v1/emails/send
Required scope: smtp:send
Rate limits:
- 100 emails per minute per API key
- Maximum 10 MB HTML content
- Maximum 25 attachments (25 MB total)
Required fields:
from- Sender email (must be from a verified domain)to- Recipient email(s)- Either
htmlortemplate(mutually exclusive)
If you run into any issues or have questions, open an issue on GitHub.