
What You'll Build
This guide walks you through sending email broadcasts programmatically with the Kibamail API. By the end, you'll know how to:
- Create an API key with the right permissions
- Install and configure the Node.js SDK
- Send broadcasts to email addresses, segments, or topics
- Test broadcasts in sandbox mode without sending real emails
- Personalize emails with per-recipient variables
- Retrieve broadcast statistics and individual send data
Prerequisites
Before starting, make sure you have:
- A Kibamail account with a workspace
- A verified sending domain in your workspace
- Node.js 18 or higher installed
- Basic familiarity with TypeScript/JavaScript
Step 1: Create an API Key
API keys authenticate your application with Kibamail. Each key has specific permissions (scopes) that control what it can do.
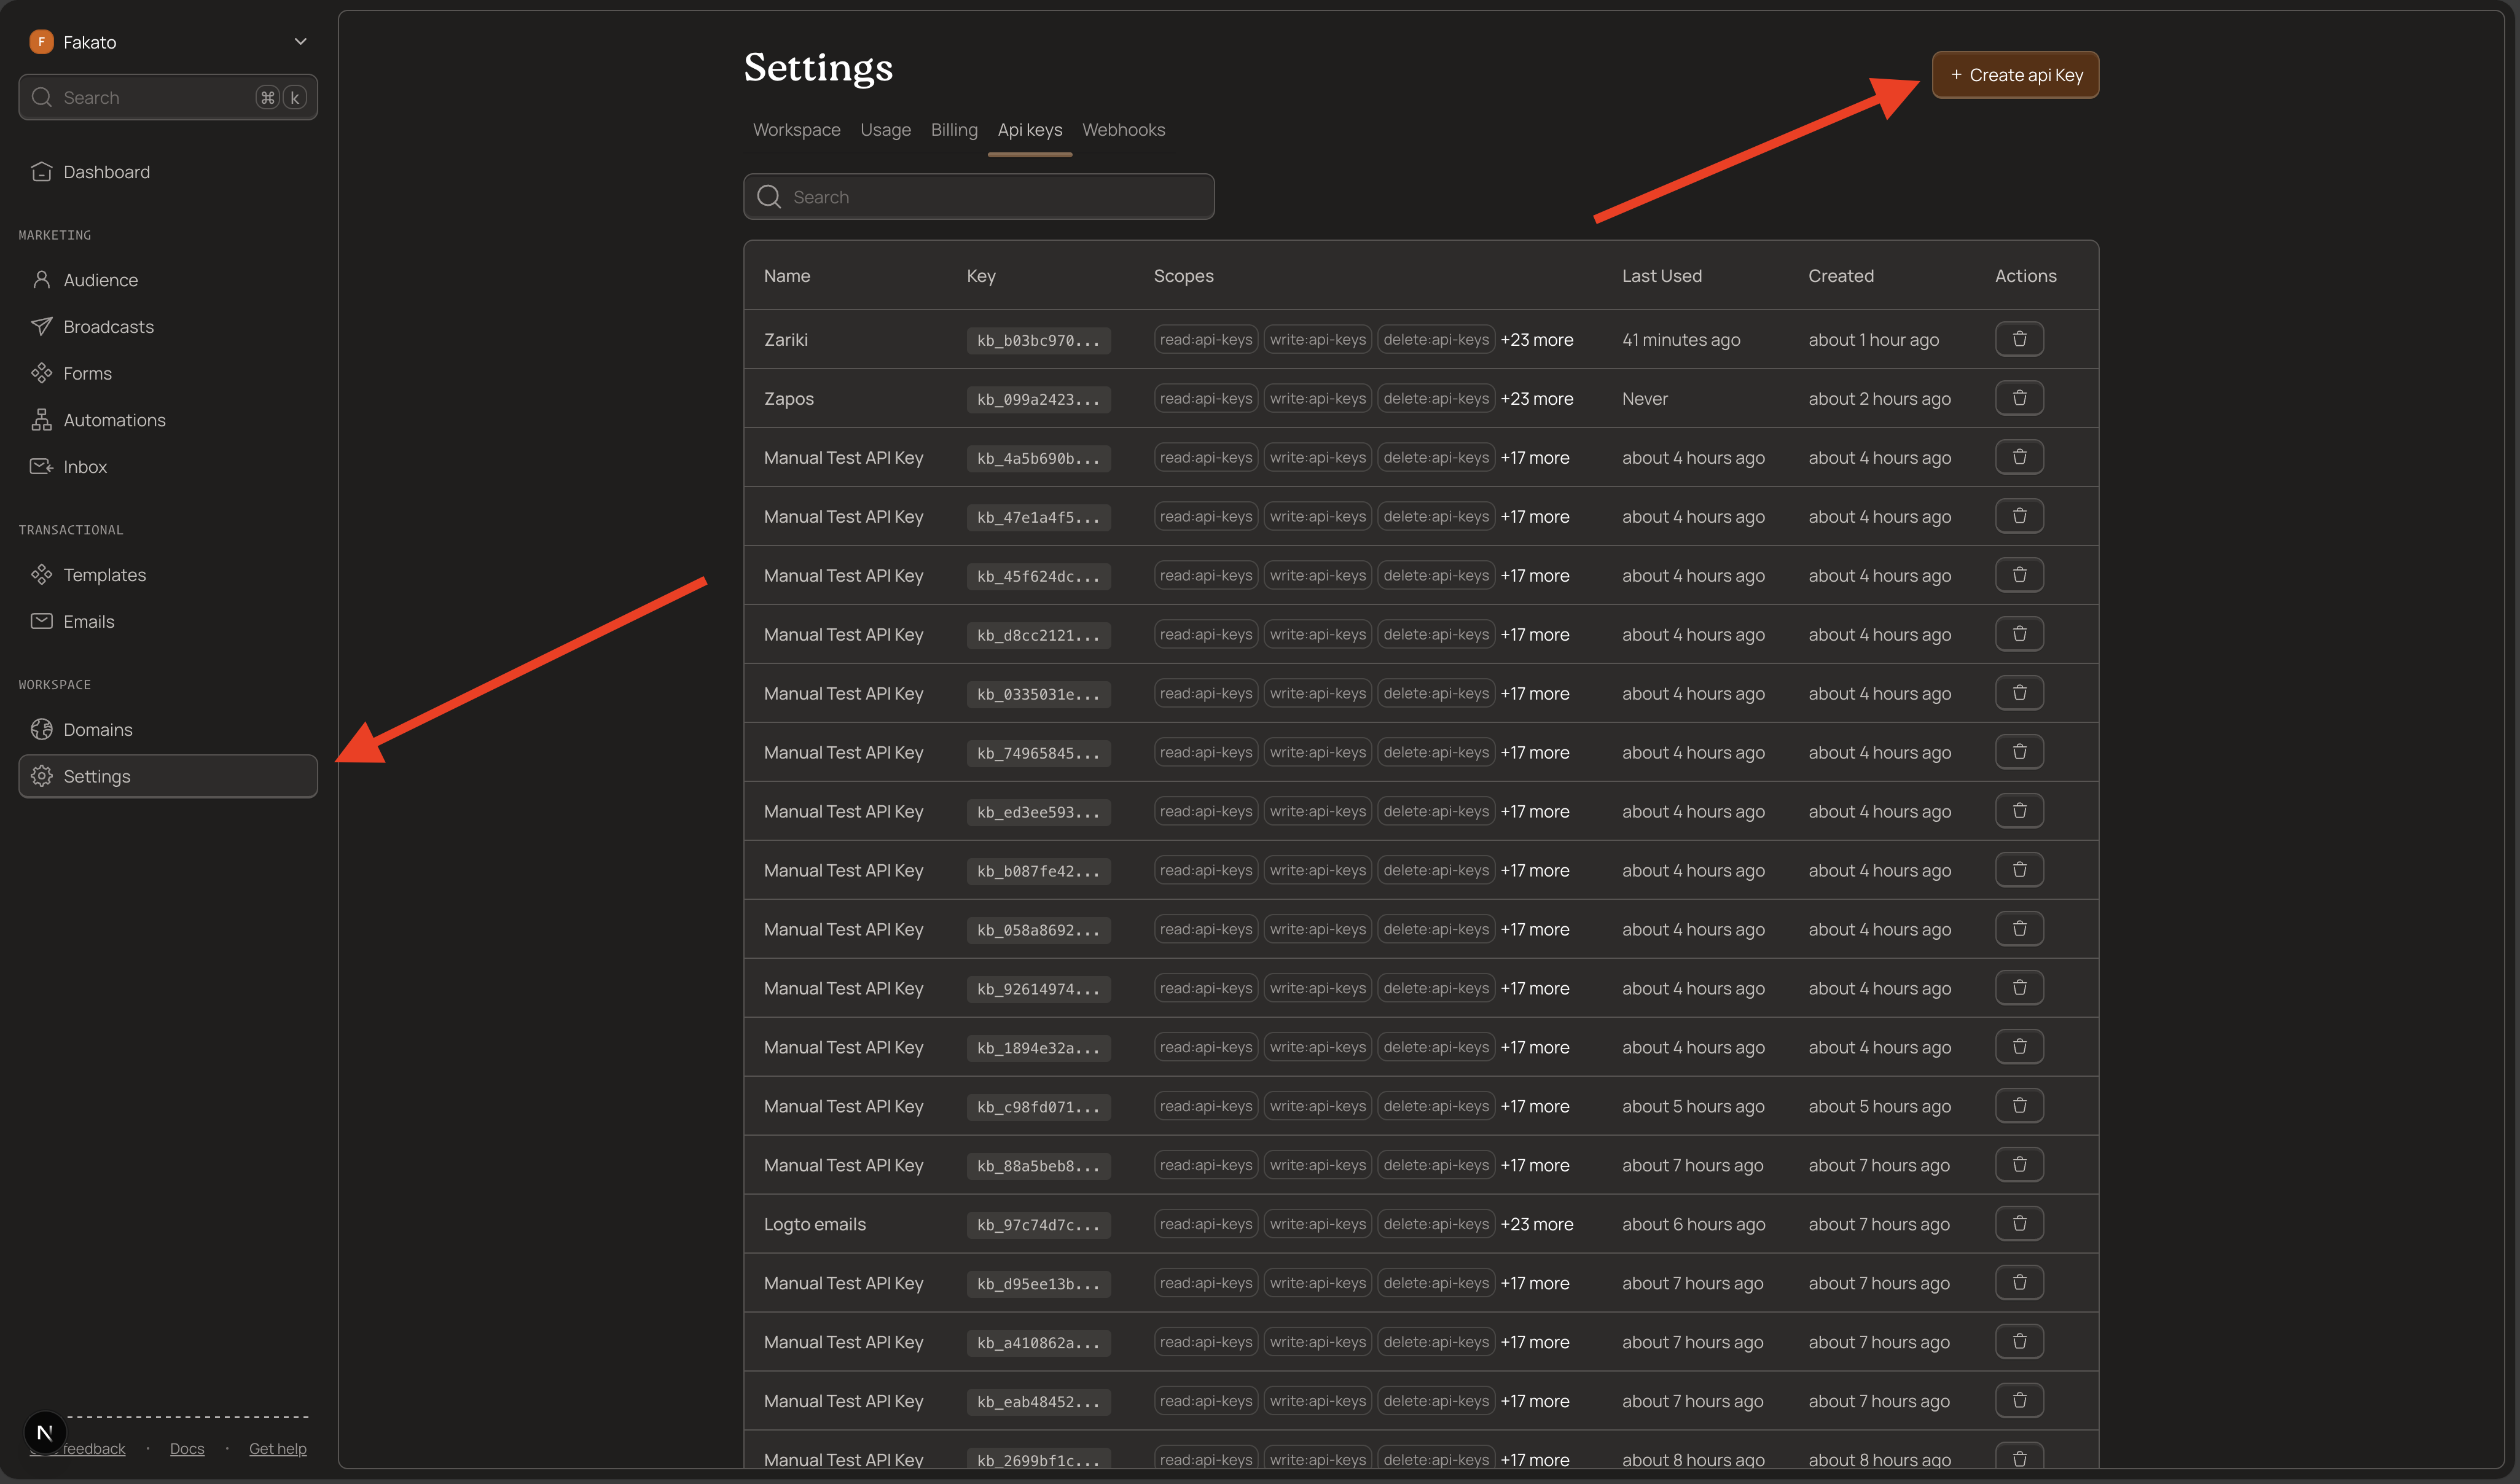
Navigate to API Keys
- Log into your Kibamail dashboard
- Go to Settings → API Keys
- Click Create API Key
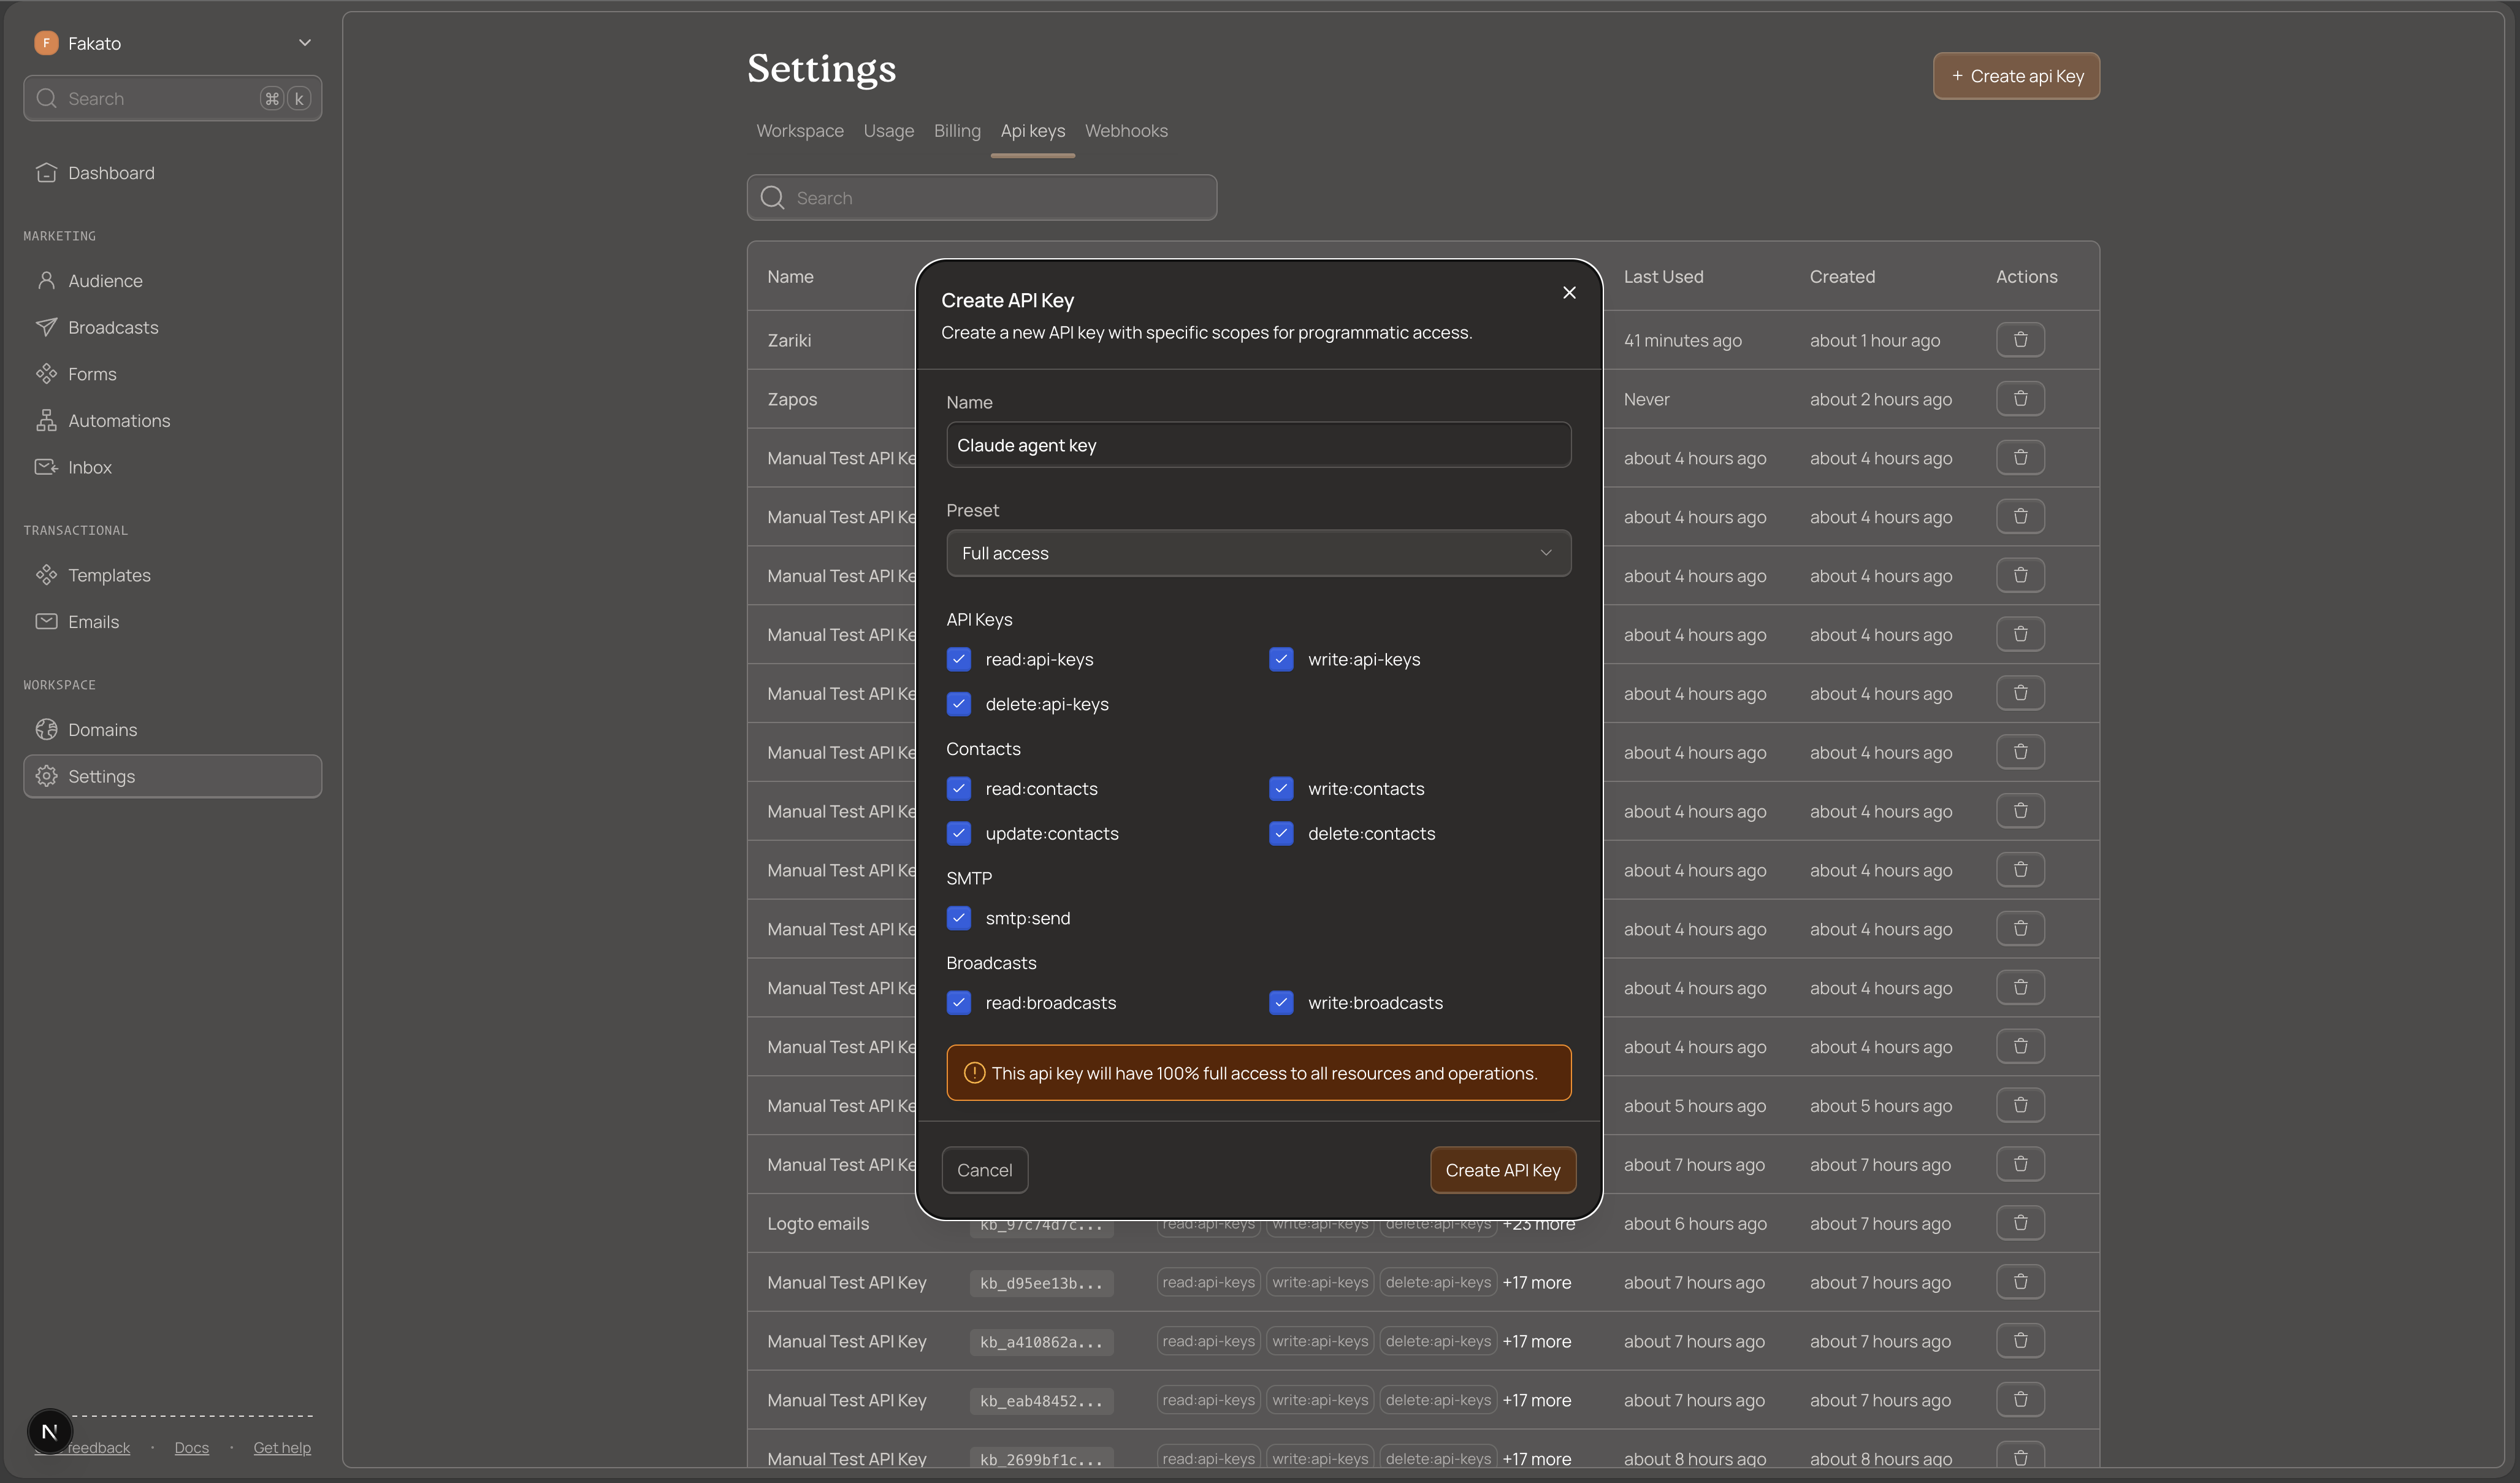
Configure Your Key
Give your key a descriptive name like "Broadcast Server" or "Newsletter App".
For sending broadcasts, select the broadcasts:write scope. If you also want to read contact data, add read:contacts.
Save Your Key Securely
After creation, Kibamail displays the full key once. It starts with kb_ and looks like this:
kb_live_1234567890abcdefghijklmnopqrstuvwxyzCopy this key immediately and store it securely. You cannot retrieve it again. If you lose it, create a new key.
Security best practices:
- Store keys in environment variables, never in code
- Never commit keys to version control
- Rotate keys every 90 days
- Use the minimum required scopes
Step 2: Install the Node.js SDK
The Kibamail SDK provides a type-safe interface for the API. It handles authentication, request formatting, and error handling.
Install the Package
npm install kibamailOr with your preferred package manager:
yarn add kibamail
pnpm add kibamail
bun add kibamail
Initialize the Client
Create a new file or add to your existing code:
import { Kibamail } from "kibamail";

const kibamail = new Kibamail(process.env.KIBAMAIL_API_KEY);
The SDK reads your API key from the environment variable. Set it in your .env file:
export KIBAMAIL_API_KEY=kb_live_your_key_hereStep 3: Send Your First Broadcast
Broadcasts send the same email to multiple recipients at a scheduled time. You can target email addresses, contact IDs, segments, or topics.
Basic Broadcast to Email Addresses
This example sends a newsletter to a list of email addresses:
import { Kibamail } from "kibamail";

const kibamail = new Kibamail(process.env.KIBAMAIL_API_KEY);

async function sendNewsletter() {
  // Schedule for 10 minutes from now
  const sendAt = new Date();
  sendAt.setMinutes(sendAt.getMinutes() + 10);

  const { data, error } = await kibamail.broadcasts.createAndSend({
    name: "January Newsletter",
    from: "newsletter@yourdomain.com",
    emailContent: {
      subject: "Our January Newsletter",
      html: "<h1>Hello {{firstName}}!</h1><p>Welcome to our monthly update.</p>",
      previewText: "See what's new this month...",
    },
    recipients: {
      emails: [
        "subscriber1@example.com",
        "subscriber2@example.com",
        "subscriber3@example.com",
      ],
    },
    sendAt: sendAt.toISOString(),
  });

  if (error) {
    console.error("Broadcast failed:", error.message);
    return;
  }

  console.log("Broadcast scheduled:", data.id);
}

sendNewsletter();
The sendAt field must be a future ISO 8601 timestamp. Kibamail queues the broadcast and sends it at the scheduled time.
Step 4: Personalize with Variables
Make your broadcasts more engaging by personalizing content for each recipient. Use {{variableName}} syntax in your subject, body, and preview text.
Using Contact Properties
If recipients exist as contacts in your workspace, Kibamail automatically substitutes their properties:
const { data, error } = await kibamail.broadcasts.createAndSend({
  name: "Personalized Welcome",
  from: "hello@yourdomain.com",
  emailContent: {
    subject: "Welcome, {{firstName}}!",
    html: `
      <h1>Hi {{firstName}} {{lastName}},</h1>
      <p>Thanks for joining us. Your email is {{email}}.</p>
    `,
    previewText: "Welcome to the family, {{firstName}}",
  },
  recipients: {
    emails: ["john@example.com", "jane@example.com"],
  },
  sendAt: sendAt.toISOString(),
});
Per-Email Custom Variables
For dynamic data that isn't stored on contacts (like order numbers), pass variables with each email:
const { data, error } = await kibamail.broadcasts.createAndSend({
  name: "Order Confirmation Campaign",
  from: "orders@yourdomain.com",
  emailContent: {
    subject: "Your Order #{{orderNumber}} is confirmed!",
    html: `
      <h1>Thank you, {{firstName}}!</h1>
      <p>Your order #{{orderNumber}} totaling ${{
        orderTotal,
      }} has been confirmed.</p>
      <p>Expected delivery: {{deliveryDate}}</p>
    `,
  },
  recipients: {
    emails: [
      {
        email: "customer1@example.com",
        variables: {
          firstName: "John",
          orderNumber: "ORD-12345",
          orderTotal: 99.99,
          deliveryDate: "January 20, 2025",
        },
      },
      {
        email: "customer2@example.com",
        variables: {
          firstName: "Jane",
          orderNumber: "ORD-12346",
          orderTotal: 149.5,
          deliveryDate: "January 22, 2025",
        },
      },
    ],
  },
  sendAt: sendAt.toISOString(),
});
Variable priority (highest to lowest):
- Per-email variables from the API request
- Contact properties from your workspace
- Built-in variables (email, firstName, lastName)
Per-email variables override contact properties but are not saved to the contact record.
Step 5: Target Segments and Topics
Instead of listing individual emails, send to groups of contacts using segments or topics.
Send to a Segment
Segments are dynamic groups filtered by conditions. All contacts matching the segment criteria receive the broadcast:
const { data, error } = await kibamail.broadcasts.createAndSend({
  name: "VIP Customer Promotion",
  from: "promotions@yourdomain.com",
  emailContent: {
    subject: "Exclusive VIP Offer for {{firstName}}",
    html: "<h1>Hi {{firstName}}!</h1><p>As a VIP customer, you get 25% off!</p>",
    previewText: "Your exclusive VIP discount awaits...",
  },
  recipients: {
    segment: "seg_vip_customers_abc123",
  },
  sendAt: sendAt.toISOString(),
});
Find segment IDs in your Kibamail dashboard under Audience → Segments.
Send to Topic Subscribers
Topics let contacts choose what emails they want to receive. Send to everyone subscribed to a specific topic:
const { data, error } = await kibamail.broadcasts.createAndSend({
  name: "Product Updates",
  from: "updates@yourdomain.com",
  emailContent: {
    subject: "New Features Released!",
    html: "<h1>Hey {{firstName}}!</h1><p>Check out our latest features...</p>",
    previewText: "See what's new in our product",
  },
  recipients: {
    topic: "top_product_updates_xyz789",
  },
  sendAt: sendAt.toISOString(),
});
Find topic IDs under Audience → Topics.
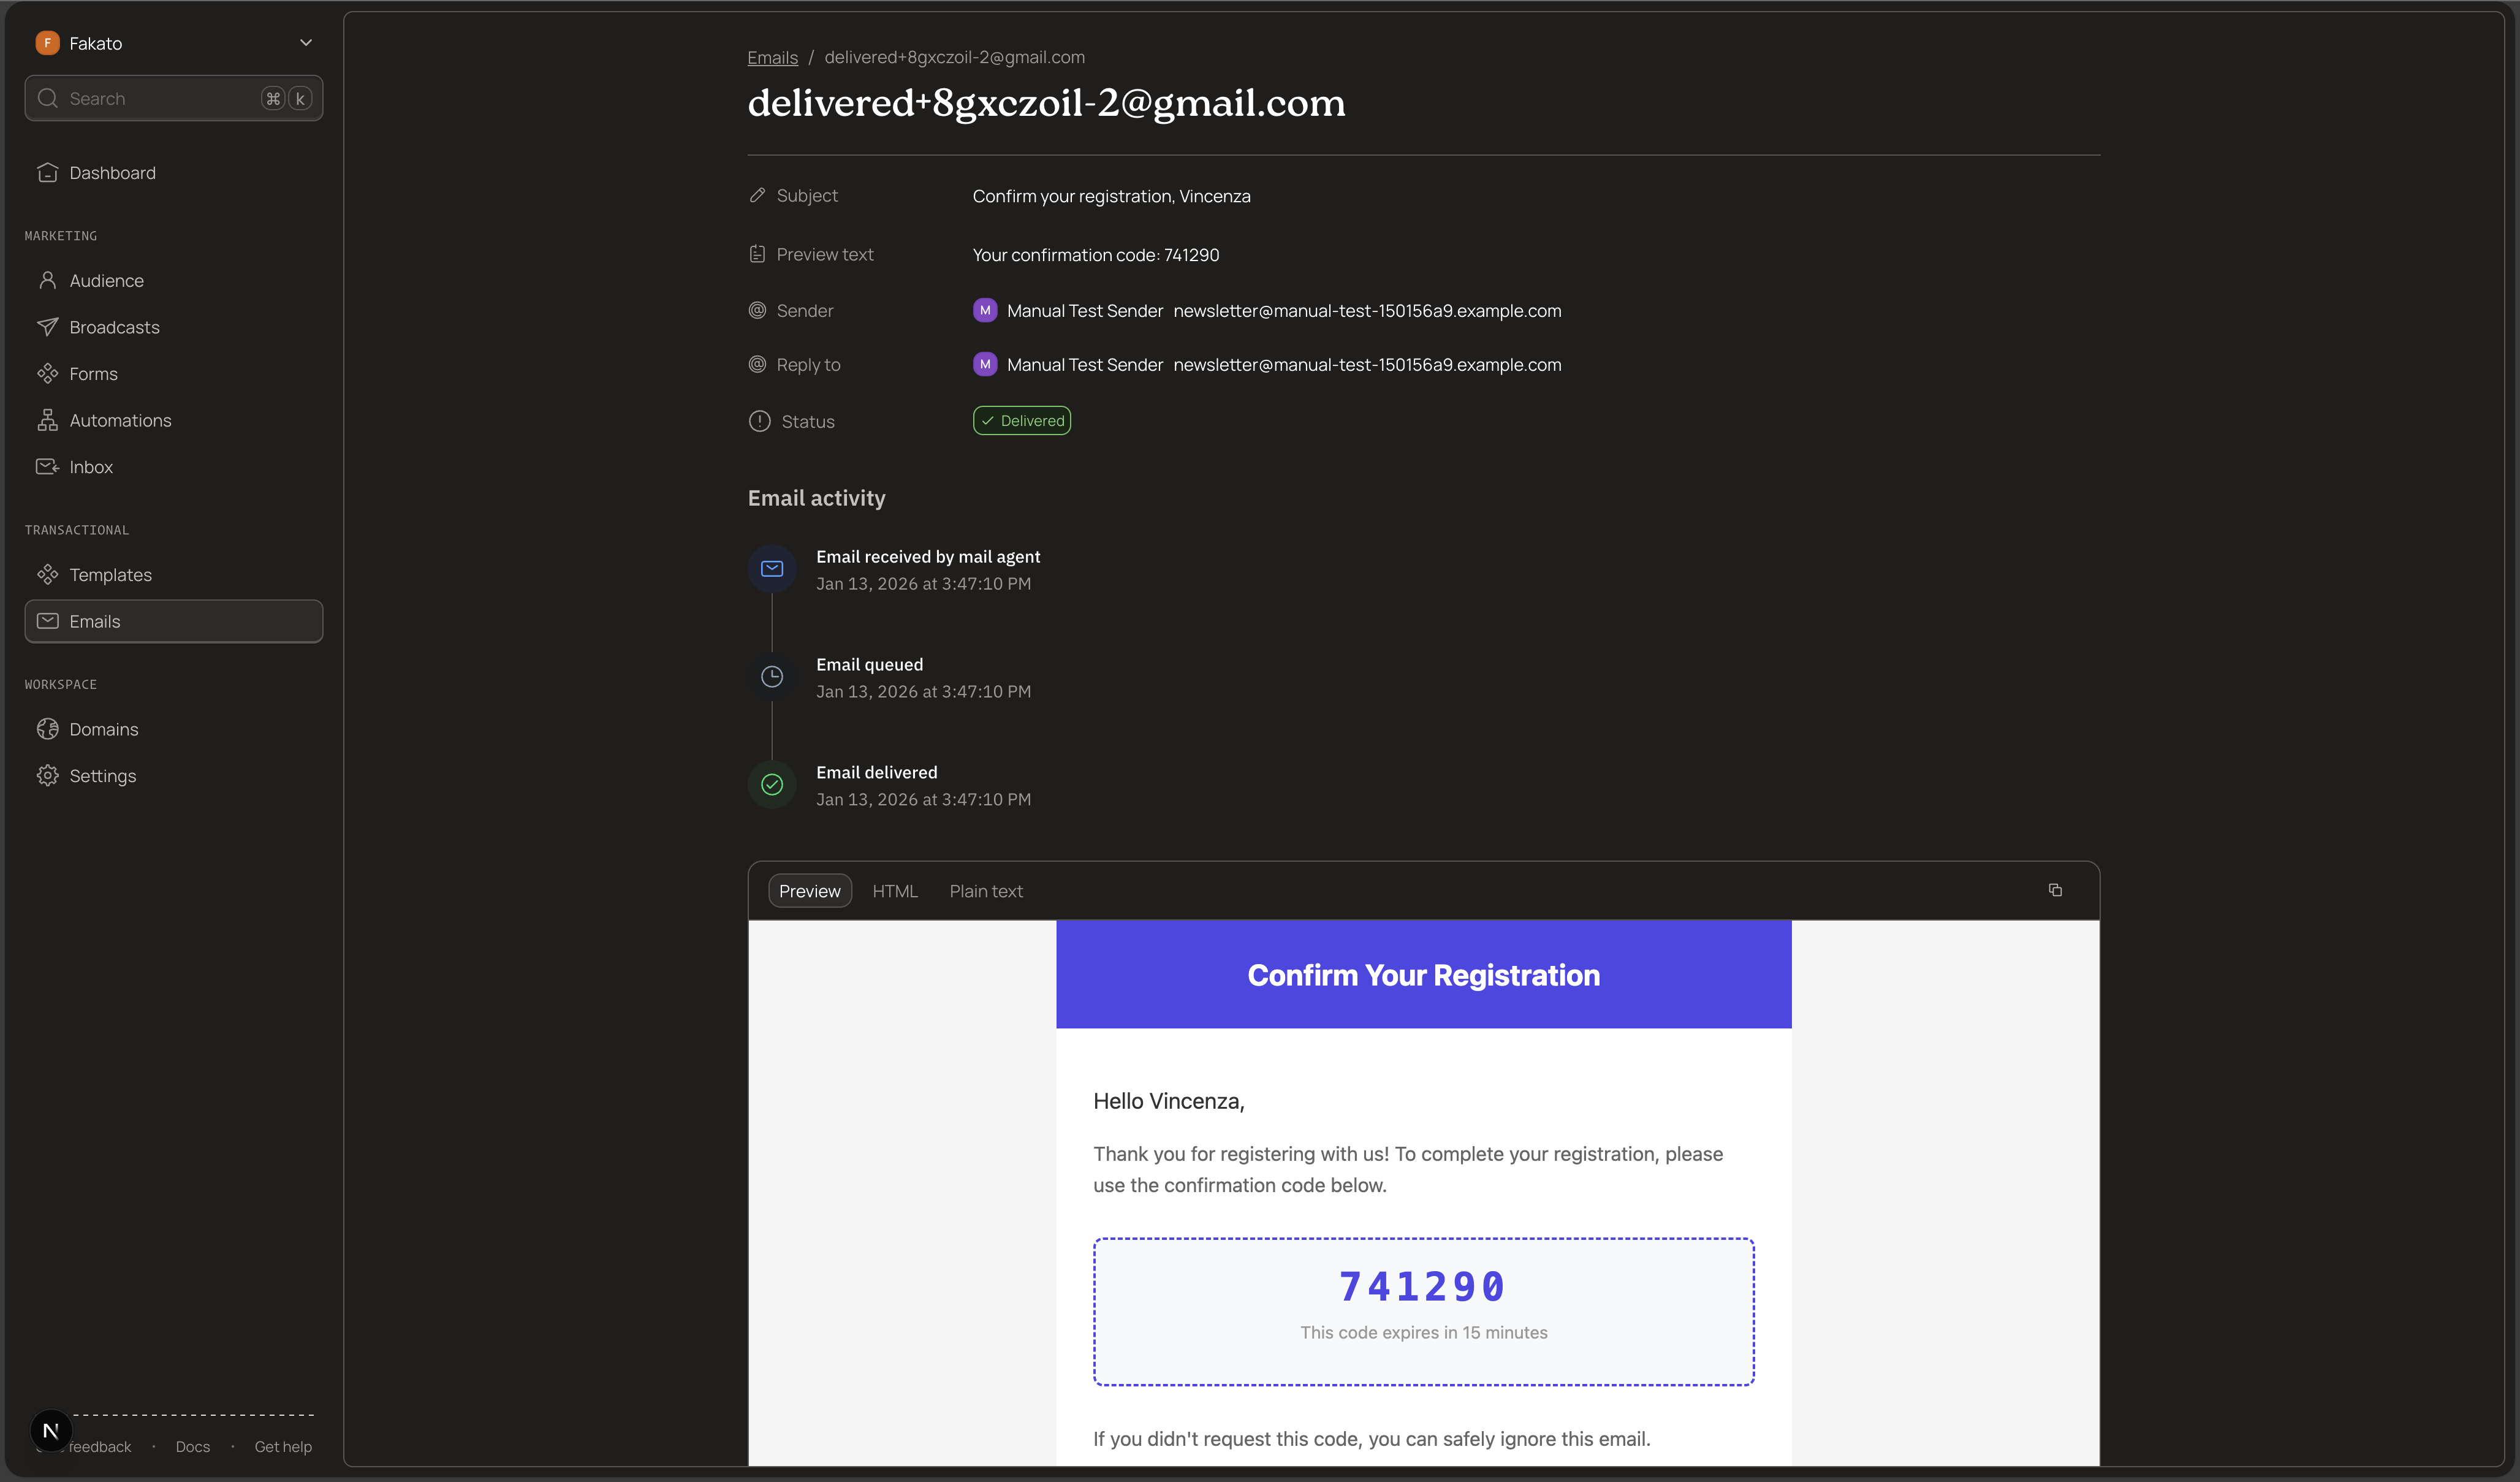
Step 6: Test with Sandbox Mode
Before sending to real subscribers, test your broadcasts using sandbox addresses. These simulate different delivery outcomes without sending actual emails.
Sandbox Email Addresses
Use @kibamail.dev addresses to test:
| Address | Simulated Outcome |
|---|---|
delivered@kibamail.dev |
Successful delivery |
bounced@kibamail.dev |
Hard bounce |
softbounce@kibamail.dev |
Soft bounce (transient failure) |
complained@kibamail.dev |
Spam complaint |
failed@kibamail.dev |
Permanent delivery failure |
delayed@kibamail.dev |
Delayed delivery (retries then succeeds) |
opened@kibamail.dev |
Delivered + opened |
clicked@kibamail.dev |
Delivered + opened + clicked |
Test Broadcast Example
const { data, error } = await kibamail.broadcasts.createAndSend({
  name: "Test Broadcast - Delivery Outcomes",
  from: "newsletter@yourdomain.com",
  emailContent: {
    subject: "Test Email for {{firstName}}",
    html: "<h1>Hello {{firstName}}!</h1><p>Testing {{outcome}} behavior.</p>",
    previewText: "Testing email delivery outcomes",
  },
  recipients: {
    emails: [
      {
        email: "delivered@kibamail.dev",
        variables: {
          firstName: "Delivered User",
          outcome: "successful delivery",
        },
      },
      {
        email: "bounced+test1@kibamail.dev",
        variables: { firstName: "Bounced User", outcome: "hard bounce" },
      },
      {
        email: "opened@kibamail.dev",
        variables: { firstName: "Engaged User", outcome: "open tracking" },
      },
      {
        email: "clicked+cta@kibamail.dev",
        variables: { firstName: "Clicking User", outcome: "click tracking" },
      },
    ],
  },
  sendAt: sendAt.toISOString(),
});
Sandbox behavior:
- Events generate instantly (no actual email sent)
sendAtcan be any future time (processed immediately)- Add
+labelfor tracking:delivered+campaign1@kibamail.dev - Cannot mix sandbox and real addresses in the same broadcast
- Per-email variables work with sandbox addresses
Step 7: Handle Errors
The SDK returns errors in a consistent format. Always check for errors before using the response data:
const { data, error } = await kibamail.broadcasts.createAndSend({
  // ... broadcast config
});

if (error) {
  console.error(`Error [${error.code}]: ${error.message}`);
  console.error("Request ID:", error.requestId);

  // Handle specific error types
  if (error.type === "validation_error" && error.validationErrors) {
    for (const fieldError of error.validationErrors) {
      console.error(`  ${fieldError.field}: ${fieldError.message}`);
    }
  }

  return;
}

// Success - use data safely
console.log("Broadcast ID:", data.id);
Common Errors
| Error Code | Cause | Solution |
|---|---|---|
INVALID_API_KEY |
Missing or invalid API key | Check your environment variable |
INSUFFICIENT_SCOPES |
Key lacks broadcasts:write |
Create a new key with correct scopes |
DOMAIN_NOT_VERIFIED |
Sending domain not verified | Verify your domain in settings |
SEND_AT_IN_PAST |
Scheduled time is in the past | Use a future timestamp |
NO_RECIPIENTS |
No valid recipients found | Check recipient emails or segment/topic |
Step 8: Retrieve Broadcast Statistics and Sends
After sending a broadcast, you can retrieve delivery statistics and individual send records via the API. The dashboard view for this data is in development, but full access is available through the Node.js SDK.
Your API key needs the read:broadcasts scope.
Get Aggregate Statistics
const { data: stats } = await kibamail.broadcasts.stats.get("bc_abc123");

// stats.recipients.total, stats.recipients.delivered, stats.recipients.bounced
// stats.engagement.openRate, stats.engagement.clickRate, stats.engagement.clickToOpenRate
// stats.deliverability.deliveryRate, stats.deliverability.bounceRate
Available metrics:
| Category | Metrics |
|---|---|
| Recipients | total, queued, sent, delivered, bounced, complained, failed, unsubscribed |
| Engagement | opened, clicked, openRate, clickRate, clickToOpenRate |
| Deliverability | deliveryRate, bounceRate, complaintRate |
List Individual Sends
Fetch per-recipient delivery data with cursor-based pagination:
const { data: page } = await kibamail.broadcasts.sends.list("bc_abc123", {
  limit: 50,
});

// Each send includes: email, status, queuedAt, sentAt, deliveredAt,
// firstOpenedAt, firstClickedAt, openCount, clickCount,
// bounceClassification, lastResponseCode, lastResponseMessage

// Paginate with cursor
if (page.hasMore) {
  const lastId = page.data[page.data.length - 1].id;
  const { data: nextPage } = await kibamail.broadcasts.sends.list("bc_abc123", {
    limit: 50,
    after: lastId,
  });
}
Filter by Status
const { data: bounced } = await kibamail.broadcasts.sends.list("bc_abc123", {
  status: "BOUNCED",
});

const { data: complained } = await kibamail.broadcasts.sends.list("bc_abc123", {
  status: "COMPLAINED",
});
Status values: QUEUED, SENDING, DELIVERED, BOUNCED, COMPLAINED, FAILED
Data Retention
Individual send records are retained for 60 days. After that, only aggregate statistics remain. The stats.detailsPruned flag indicates whether send data is still available.
Complete Example
Here's a full working example that sends a personalized newsletter:
import { Kibamail } from "kibamail";

const kibamail = new Kibamail(process.env.KIBAMAIL_API_KEY);

interface Subscriber {
  email: string;
  firstName: string;
  loyaltyPoints: number;
  membershipTier: string;
}

async function sendMonthlyNewsletter(subscribers: Subscriber[]) {
  // Schedule for 10 minutes from now
  const sendAt = new Date();
  sendAt.setMinutes(sendAt.getMinutes() + 10);

  const recipients = subscribers.map((sub) => ({
    email: sub.email,
    variables: {
      firstName: sub.firstName,
      loyaltyPoints: sub.loyaltyPoints,
      membershipTier: sub.membershipTier,
    },
  }));

  const { data, error } = await kibamail.broadcasts.createAndSend({
    name: `Monthly Newsletter - ${new Date().toISOString().slice(0, 7)}`,
    from: "newsletter@yourdomain.com",
    replyTo: "support@yourdomain.com",
    emailContent: {
      subject: "Your Monthly Update, {{firstName}}!",
      html: `
        <h1>Hi {{firstName}},</h1>
        <p>Thanks for being a {{membershipTier}} member!</p>
        <p>You have <strong>{{loyaltyPoints}}</strong> loyalty points.</p>
        <p>Here's what's new this month...</p>
      `,
      previewText: "{{membershipTier}} exclusive: Your monthly update is here",
    },
    recipients: { emails: recipients },
    sendAt: sendAt.toISOString(),
  });

  if (error) {
    throw new Error(`Broadcast failed: ${error.message}`);
  }

  return {
    broadcastId: data.id,
    scheduledFor: sendAt,
    recipientCount: subscribers.length,
  };
}

// Usage
const subscribers = [
  {
    email: "john@example.com",
    firstName: "John",
    loyaltyPoints: 1500,
    membershipTier: "Gold",
  },
  {
    email: "jane@example.com",
    firstName: "Jane",
    loyaltyPoints: 3200,
    membershipTier: "Platinum",
  },
];

sendMonthlyNewsletter(subscribers)
  .then((result) => console.log("Broadcast scheduled:", result))
  .catch((err) => console.error(err));
API Reference
Create and Send Broadcast
Endpoint: POST /v1/broadcasts/create-and-send
Required scope: broadcasts:write
Rate limits:
- 100 broadcasts per hour per workspace
- Maximum 100,000 recipients per broadcast
Get Broadcast Statistics
Endpoint: GET /v1/broadcasts/{broadcastId}/stats
Required scope: read:broadcasts
Returns aggregate statistics including recipient counts, engagement metrics, and deliverability rates.
List Broadcast Sends
Endpoint: GET /v1/broadcasts/{broadcastId}/sends
Required scope: read:broadcasts
Query parameters:
| Parameter | Type | Description |
|---|---|---|
limit |
number | Number of sends to return (default: 20, max: 100) |
after |
string | Cursor for pagination - ID of last send from previous page |
before |
string | Cursor for reverse pagination |
status |
string | Filter by status: QUEUED, SENDING, DELIVERED, BOUNCED, COMPLAINED, FAILED |
Returns paginated list of individual send records with delivery status and engagement data.
If you run into any issues or have questions, open an issue on GitHub.